• Skip to main content
  • Skip to primary sidebar
  • Skip to footer

Skipping Stone Design

Skipping Stone Design

  • Home
  • About
  • Health
  • Lifestyle
  • Tips
  • Budget
  • Travel
  • Contact

Tips

Can You DIY Concrete Floor Overlay?

November 23, 2020

Whether you have a concrete patio or an interior flooring in desperate need of repair, resurfacing, or improvement for decorative reasons, concrete overlay is the best and most affordable solution. Concrete overlay isn’t difficult to find. In fact, there are various types and high-quality concrete overlays in Houston. In case you’re wondering if you can DIY concrete floor overlay at home, definitely yes! Most people hire professional concrete installers to do the work but it is actually quite an easy and exciting project. However, you will need some training and practice before you start looking for concrete overlays near you and dive in on a DIY project. In this article, we will explore what concrete floor overlay is, the types of concrete floor overlay, and how to DIY concrete floor overlay.

What is Concrete Overlay?

A concrete overlay is a thin color concrete cement based product you apply over an existing concrete for repair or aesthetic purposes. Although each manufacturer has its own proprietary blend, concrete overlay is usually composed of portland cements, various aggregates and polymer resins which work as a “glue” that bonds the overlay to the existing concrete. Depending on your desired finish, you can apply concrete overlay as thin as paper or in most cases, up to 3/4 inch.

Types of Concrete Floor Overlays

Concrete floor overlays come in different varieties, uses, and applications. It is important to know what you want for a finished look, which works best for your interior surfaces, and the ones that fit your outdoor or recreation area. Here are the most common types of concrete overlays:

  • Stamped concrete overlay gives the concrete floor the appearance and texture of wood, tile, brick or cobblestone making it a great choice for both indoors and outdoor application. This type of overlay also takes staining very well that is why it can be integrally colored as desired.
  • Spray down or sprayed on concrete overlay is great for areas in your home that require a knockdown  texture for a slip-resistance cement surface such as pool decks, patios, walkways, and driveways.
  • Micro-toppings overlay rejuvenates old, worn concrete floors and repairs small imperfections, giving them the look of new concrete. It is ultra thin and usually not more than 3/16 inch.
  • Self-leveling overlay fixes an unlevelled surface. The good thing about this overlay is it dries very fast and can be walked on in a couple of hours. Applying this overlay could be quite tricky that is why it is crucial to follow the manufacturer’s technical data sheets if you really opt for this type of overlay. Since it is sensitive to ambient conditions, applying this overlay demands a short working window and religiously following the right amount of liquid component. Otherwise, it will not flow and set if you put too little, or it will crack if put too much.

How to DIY Concrete Floor Overlay

There are many things you should consider before starting a DIY concrete floor overlay, including the structural integrity of the concrete floor being resurfaced and the look you want to achieve. If the existing floor is badly cracked, settled or soft and powdery you should postpone your overlay plans and completely replace it instead. Aside from that, you should discuss with a professional or do some readings about the conditions that will affect the quality and longevity of the concrete overlay as well as the maintenance required. After you have done these steps, you’re all set to begin your DIY project!

In installing concrete overlay there are a few steps involved which should be tackled systematically.

Preparation

Concrete overlays usually hold strongly to the existing concrete flooring but if you want the application to be seamless and your concrete overlay to last, it is crucial to prepare the surface to be applied on. Here’s how you prepare your existing concrete floor:

  1. Clear the concrete base from all kinds of substances like dirt, grease, paint, and sealants that may prevent the overlay from bonding.
  2. Achieve a solid concrete base by removing spoiled concrete like delamination, spalling and scaling.
  3. Make sure the cracks are filled in so that they are not evident on the overlay.
  4. To ensure that the polished concrete flooring overlay holds well, apply mechanical profiling or acid etching to roughen the surface of the concrete base.
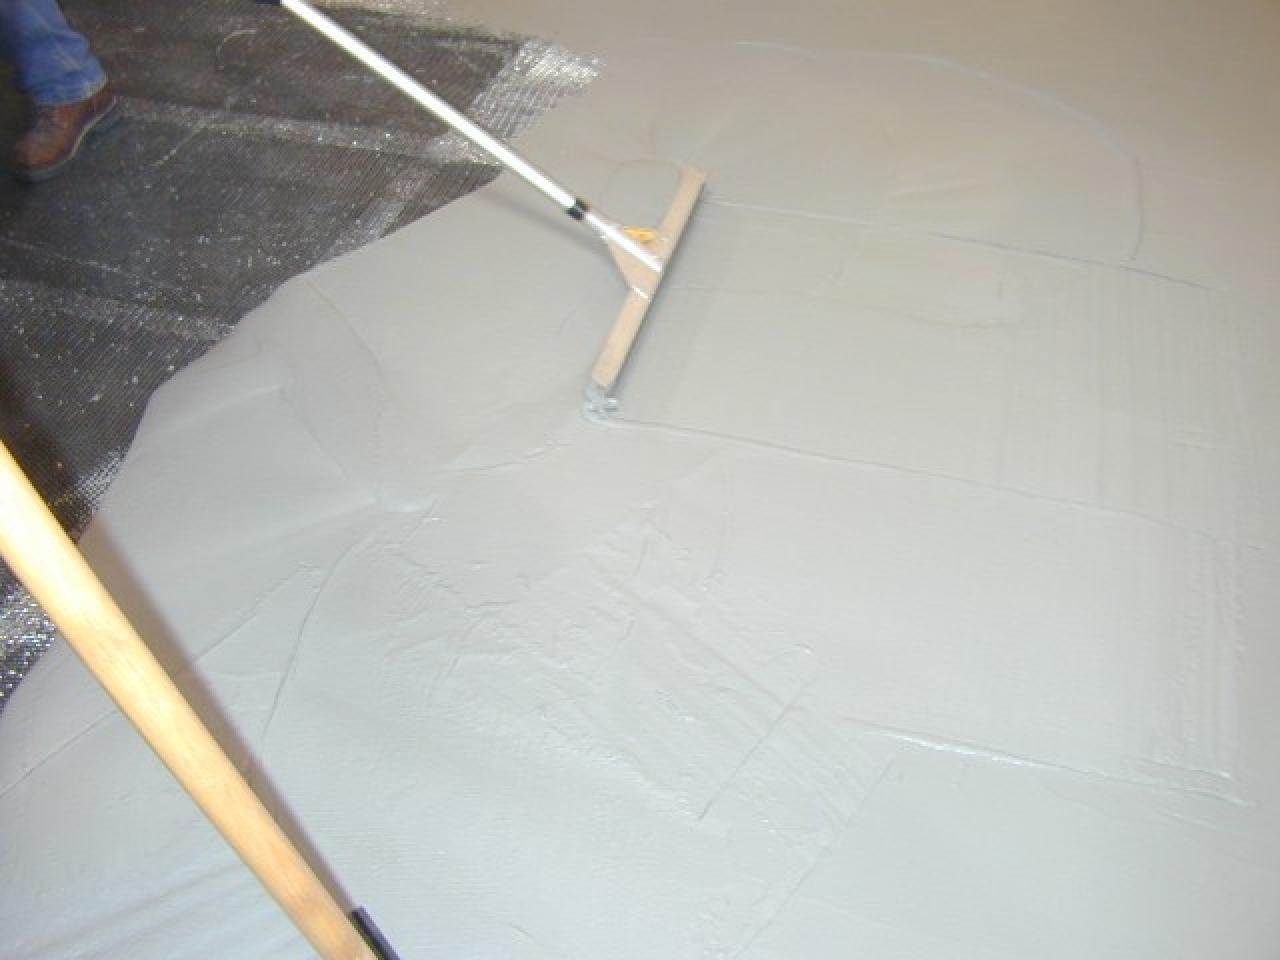
Overlaying Process

Although concrete overlays come in different forms — some come pre-blended mix that require you to add water; others require mixing the polymer additive and any pigmentation desired with the cement and other dry ingredients; and there are those that can go right over properly prepared surfaces — follow the manufacturer’s instructions in applying your concrete overlay onto the base.

Depending on the properties of the cement overlay, the drying period will last for about three to five days.

Conclusion

Concrete overlay is a very exciting and rewarding DIY project. Even if you’re not an expert, you can permanently cover up surface imperfections in your existing concrete floors and give it a complete face-lift and at a much lower cost. If you’re doing it for the first time, buy different types of concrete overlays and try each of them on some hardy board or old concrete. You can check out https://www.houstondecorativeconcrete.com/ today for premium, cost-effective, and reliable concrete overlays in Houston.


Filed Under: Tips

How Long Does It Take to Install a Pool?

November 19, 2020

It’s getting hotter and hotter each year. And now, more than ever, you need a cool quiet private oasis where you can enjoy some peace!

Adding a pool to your home can not only give you a perfect private oasis, but it’s also good for your home value! Studies found that adding a pool increased home values between $11,591 and $95,393!

But how long does it take to install a pool? Are they going to finish building it before it gets too cold to use it?

Keep reading to learn everything you need to know before you break ground on your pool project.

Design Phase

During this phase, you will talk to your contractor and come up with a plan for your pool. The back and forth of settling on specific design details can take one to four weeks.

Sometimes, you may need to go back to the design phase if you cannot get the proper permits or other complications arise.

Permitting Phase

Most residential areas want you to have a residential building permit before you build your swimming pool. If you don’t get the permits before building, they could force you to stop in the middle of construction.

The bad news is that this phase could take anywhere from one week to six weeks or more.

Sometimes you can get approved and permits in hand within two weeks. Other local governments want several approvals, you need to attend a planning board meeting and then get an engineer involved! That kind of situation can take several months to get approved for your construction!

Excavation Phase

To dig the hole where your pool goes, it only takes a couple of days. At most, this phase takes a week.

Skeleton Phase

This phase includes installing all the steel supports, plumbing, and electrical wiring. This takes about one to two weeks.

If you’re installing a saltwater pool, this is when the salt-chlorine generator goes in. But, before you go all-in on a saltwater pool, make sure you understand the cost of owning a saltwater pool.

Installation Phase

Now it’s time to install the pool floor and walls. Depending on the type of material used, this phase takes one to three weeks.

How Long Does It Take to Install a Pool Overall?

If you don’t consider the time it takes to build a deck or the landscaping around the pool, it takes about seven to ten weeks from start to finish. Add another couple of weeks for the deck and landscaping.

Time Flies When You’re Having Fun… but Not When You’re Building a Pool

When you break it down into phases, the time seems to go a little faster. But, no one likes the waiting period when they can see the construction but cannot enjoy a refreshing dip, yet.

Keep in mind that the size and features of your pool could increase the length of time needed to finish the project. To help prevent any delays, make sure you and your contractor are on the same page before you begin.

We hope you enjoyed reading this article and that you no longer need to ask, “how long does it take to install a pool?”. If you’re looking for more wonderful articles about home, decor, DIY, and more, check out the rest of our blog today!

Filed Under: Tips

How to Design a Trendy Kitchen on a Budget

November 10, 2020

A minor midrange kitchen remodel averages $23,452 while a major kitchen remodel averages $68,490, according to Remodeling Magazine. If your kitchen remodeling budget comes in way lower, you can still have a trendy kitchen without going into major debt.

Refreshing your outdated kitchen with new kitchen trends is possible when you get creative. Picking a few splurges and using more affordable alternatives for other projects helps keep you on budget.

Keep reading for tips on how to get a trendy kitchen on a budget.

Create Your Trendy Kitchen Vision

New kitchen trends change all the time, and the trends span a wide range of decorating styles. Do you want a cozy farmhouse kitchen or a sleek, modern design? Maybe you have your own eclectic design style.

Before you do any work or make any plans, define your idea of a trendy kitchen. Find images of kitchens that you love as inspiration.

Pick apart those inspiration kitchens to identify the specifics that you love, from big things like countertops and cabinets to the little details like trendy kitchen handles. This helps you create your wish list and start planning the details of your remodel. Without a clear vision for the remodel, it’s difficult to find affordable alternatives and create a cohesive design.

Choose a Few Splurges

When you’re remodeling on a budget, you might think you have to give up all of the big-ticket items. But splurging on a few key pieces can give your kitchen an upscale look without breaking your budget.

When choosing your splurges, consider the things that you can’t get out of your mind. Maybe you want gorgeous quartz countertops or a gas range that professional chefs would drool over.

Another way to decide is to think about what would make the most impact. Countertops take up a large portion of your kitchen and create a focal point. A stunning backsplash or trendy apron-front sink can also make a big impression in your updated kitchen.

Just because you’re choosing some splurges doesn’t mean you have to go totally high end. If your dream gas range is still out of your budget, choose a scaled-down version that’s still impressive yet more affordable. Instead of a natural stone countertop, choose an engineered product that’s a good impersonation of the real thing.

Leave the Layout

Unless your kitchen layout has serious design flaws, keep the basic setup the way it is. Rearranging plumbing and appliances adds significant cost to your project since you have to hire contractors to move components. You’ll need a plumber to move any pipes, and you’ll need a pro to move gas lines if you have a gas stove.

Reuse What You Have

Another trick to saving on the budget is to use what you already have when possible. It’s often much cheaper to refinish things such as cabinets than it is to replace them.

Replacing kitchen cabinets with stock cabinets often starts at $4,000 to $5,000 and only goes up from there. It you choose custom cabinetry, expect the replacement to cost you at least $16,000 to $20,000. Choosing cabinet refacing instead can cut your costs in half and sometimes more.

Any time you can keep existing kitchen items, whether you leave them alone or refinish them, you’re saving on your total costs and leaving more room in the budget for other projects.

Pick Materials Carefully

Once you decide which features you’re going to replace, research your material options. Countertops and flooring can range widely in price, so picking a more affordable material with a similar look as a high-end product can save on your budget without sacrificing style. Engineered materials are often cheaper than their real counterparts while still offering a similar look and benefits.

Sometimes you can get higher end items at a discount. Remnant stone can be a cheaper way to get real stone on your countertops. Scratch and dent or floor model appliances with barely noticeable issues can let you have higher end appliances with more features at a significant discount.

Shop Around

Visiting several stores to find the materials for your kitchen can help you find the best deals. You might find the same or similar items at a different store for cheaper, whether they normally charge less or have a special sale happening.

You can also look around to find similar items for cheaper. Say you find a pendant light that you love for above your kitchen sink, but it’s out of your budget. Snap a photo, and then check out other retailers to find something similar with a lower price tag.

Patience often pays off with a lower-priced item. Something you want might go on sale in a few weeks, or it might end up on clearance where you can snag it for a lot less than normal.

Create Architectural Features

A few key stand-out features can make your kitchen feel high-end and trendy, even if they don’t cost you a lot. You might cover the back of your island with beadboard or stacked stone to draw attention. Or you might add molding to a plain stretch of cabinets to dress them up.

Having a big-impact architectural feature creates a focal point in the kitchen that draws all eyes immediately. A beautifully designed architectural feature can draw attention away from things you can’t redo or lower-end finishes you choose to stick to the budget.

Renovate in Stages

In an ideal world, you would complete your renovation all at once, but not everyone has the money upfront. A more affordable option is to upgrade your kitchen in stages. Spreading the cost over several months makes it more affordable to do all of the work you want to complete.

You might start with your cabinets and countertops to get the big things done first. Then, save up to add a tile backsplash or redo the flooring. Save up again to replace the appliances.

Enjoy a Trendy Kitchen

A trendy kitchen is within reach if you get creative with your remodeling. Knowing where to splurge and using what you have can help you cut your costs significantly.

Check out the rest of our content for more helpful and inspiring home ideas.

Filed Under: Tips

How to Add Vintage Home Decor to Your Home

November 6, 2020

Did you know that Americans spend more money on home improvement than clothes?

If you’re one of the many people who are focused on having a beautiful home instead of a beautiful wardrobe, you might be wondering how you can take your decor to the next level.

Are you interested in exploring DIY vintage home decor ideas? Keep reading to learn 5 vintage home decor tips that will make your house a cozy and vibrant space.

1. Choose a Few Statement Vintage Home Decor Pieces

If you’re new to the vintage scene, you might think it’s impossible to blend your current style with a new one. The truth is it’s simple to unite two types of designs if you start small. This is where statement pieces can work wonders for your design layout.

When you invest in bold pieces like a new couch, table, or painting, you can focus on matching those key pieces instead of trying to juggle dozens of smaller pieces.

2. Take Advantage of Blank Wall Space

Another simple way you can bring a vintage vibe into your home is to add wall art wherever you have some empty space. Whether you add shelves and decorate with small accessories or focus on larger photographs and paintings, transforming your wall space can be a fun project. You can have a blast browsing for new decor at stores like The Reclaimed Farmhouse.

3. Experiment With Wallpapers and Rugs

Vintage homes are all about funky wallpapers and eye-catching rugs. The good news is that you don’t have to commit to permanent wallpaper thanks to trendy stick-on prints. With these options, it’s never been easier to spice up small sections of your walls or cover entire rooms.

When it comes to rugs, fluffy shag rugs and rugs with bold prints can make any room much more inviting. All you have to do is measure properly and find the right colors and patterns that complement the rest of your room.

4. Small Accessories Make a Big Impact

Who says you have to go big or go home when it comes to vintage design? If you redecorate small corners of your home, you’ll discover that these spaces can influence your entire vibe. Start small by setting up a vintage coffee table, displaying some vintage accessories on a bookshelf, or even hanging up some vintage utensils and tools in the kitchen.

5. Go on a Fun Thrifting Adventure

With vintage decor rising in popularity, you can expect to find a lot of pieces that are overpriced. One of the best Pinterest vintage home decor ideas is to browse your local thrift stores to find vintage pieces that you can touch up yourself. As long as you’re okay with doing some buffing or painting, you can find a lot of gorgeous furniture and accessories for a fraction of the price.

You’ll Love These Modern Vintage Home Decor Ideas

If you follow these 5 tips for incorporating vintage home decor into your house design, you can enjoy a stylish and comfortable space in no time.

Do you want access to more vintage home decor ideas and other awesome home improvement projects? Make sure you check out the rest of our blog to find more helpful guides.

Filed Under: Tips

Crafting Your Dream Home: The Pros and Cons of Wood Siding vs Vinyl

November 4, 2020

When you’re planning your dream house, there are a variety of things to consider, both for the interior and exterior of your home. When it comes to choosing the best siding for your home, it’s important to make the right decision for you.

Here’s everything you need to know about the wood siding vs vinyl debate.

1. Wood Siding vs Vinyl: The Case for Wood

When it comes to debating wood siding vs vinyl, there are plenty of reasons why homeowners might opt for wood siding.

For starters, wood siding isn’t affected by extreme temperatures. That can make it a great option if you live somewhere where it gets very cold during the winter months.

Wood siding also comes in a variety of colors and styles, meaning you can find the perfect option that fits your home’s style and your personal taste. It’s also more eco-friendly than vinyl alternatives.

Another reason to go with wood siding? Not only does it last between 20 to 40 years, but it also maintains its value well — that means you’ll get a better return on your investment.

This can be particularly helpful if you sell your home in the future and are considering what those buyers will want.

2. Why Wood Might Not Be Right for You

Wood siding is a great option for your dream home, but there are some negatives to carefully consider before making your final choice on exterior siding. Wood siding can be expensive and difficult to install, which could impact design choices in other parts of your home.

Wood siding can also sustain damage from wood-eating insects, and it requires more maintenance and upkeep to keep it looking in peak condition.

3. Vinyl vs Wood Siding: The Case for Vinyl

If you’re looking for an alternative to wood siding, going with vinyl can be an attractive and cost-effective option.

Along with generally being less expensive than wood siding, vinyl is easy to install and doesn’t require as much maintenance to keep it looking great.

Like wood siding, there are a variety of colors and styles to choose from. But unlike wood siding, vinyl is less affected by moisture and humidity.

4. Why Vinyl Might Not Be Right for You

Although there are plenty of pros to vinyl there are still some cons to consider.

Vinyl is less environmentally friendly than other siding options, and it can crack in cold weather and over time. The good news, though, is that vinyl has come a long way and cracking is less common than it once was.

It’s always important to consider all your options and do your research. As you continue planning your dream home, don’t forget to learn about LP Smart Siding.

Find the Best Siding for Any Home

When it comes to wood siding vs vinyl, there are a variety of factors that can influence your decision. As you make your choice, don’t forget to consider everything from your budget to the temperature where you live.

For more helpful home and design tips, be sure to explore the rest of our site.

Filed Under: Tips

5 Reasons Why You Should Build a Garage

November 2, 2020

In many ways, the garage is a quintessential aspect of the American home. Rarely does it serve as a mere car storage space. A garage can become a social gathering space, thanks to the addition of a pool table and a minibar.

It can be used as a home office, where you can work quietly away from the stresses and distractions of a busy home. It can prove to be a vital space for storage, keeping your living space free of clutter.

Whatever your motivation, now is the time to build a garage. If you need more convincing, read on to find out 5 essential reasons for building a detached garage today.

1. Build a Garage to Increase Home Value

If you’re wondering whether the cost to build a garage yourself is worth it, the answer is almost certainly yes. Typically, adding a garage to a home will increase the value. Sometimes it can increase the sale value substantially.

This could come in especially handy if you are hoping to make a quick sale, as cash for houses company may offer more for a house with a garage than they would for one without.

2. Building a Garage Is Easy and Affordable

You might be thinking that the time and financial cost to build a garage is simply not worth it. However, you may be pleasantly surprised. The average cost to build a garage from start to finish can be as little as $7500.

Meanwhile, building a garage typically takes around 10 days or less, depending on how big you want it. Such a small investment of time and money may seem worth it when you consider what a garage can offer.

3. Increase and Enhance Your Living Space

The size of a garage is only limited by the size of the lot that your house is on. When learning how to build a garage you will quickly realize just how much extra living space is on offer.

You could have a garage that has the same surface area as your entire house if you have the space that allows for it. At a time where living space is at a higher premium than ever, building a garage just makes sense.

4. More Security for You and Your Family

It is pretty clear that having a garage is a reliable way to deter thieves. If you have to park your car on the driveway or, even worse, down the street, then your vehicle is easy prey for thieves.

Across much of the US, car thefts and burglaries are on the rise. Simply having a garage where you can store your car at night could give you and your family the peace of mind you deserve.

5. A Space That Can Be Your Own

Finally, it is worth emphasizing that a garage can be anything you want it to be. Once it is built, it is up to you how you use it.

Perhaps you want a home office. Perhaps you want to throw in a minibar, a jukebox, and a plasma TV. Perhaps you want a workshop to practice your hobbies.

Essential Real Estate Hacks for You

Once you know how to build a garage, there are no limits to the upgrades that you can add to your home. If you want to do everything you can to increase your home’s value and get the listing price you deserve, we are here to help.

At our portal for Home Sellers, you will find all of the resources you need to ensure you get good price for your home.

Filed Under: Tips

3 Mistakes You Can’t Afford to Make When You Sell Your House Yourself

October 31, 2020

Today’s the day! You’ve pondered about it for weeks, but it’s time to move forward with selling your house yourself!

But there’s a problem. You priced your home too low, and now you have a week to move out without enough cash to go anywhere.

As you can see, for first-time home sellers, selling your house without a realtor is a confusing minefield to navigate. But how do you avoid stepping on these proverbial mines?

Well, you’ve come to the right place. We’re here to break down the three mistakes you can’t afford to make when you sell your house yourself!  So without further ado, let’s get started!

1. Trying to Sell Your House Yourself Without Doing Research

For starters, it’s important to know what you’re getting into before you try to sell a house all alone. Without a realtor, all their responsibilities fall on your shoulders. This means you have to promote the house, show the house to potential buyers, keep the property spotless, go through piles of legal paperwork and deeds…it’s exhausting!

Not only will a lot more of your time than you’d like to spend get funneled into this project, but realtors know the regulations about real estate law and procedures so they can avoid any nasty fees. If you’re not well-versed in this law, you risk falling into multiple expensive fees with no one to pull you out or advise you on how to avoid them.

You also need to prepare that your house will not have the same “press” it would have with a real estate agent, meaning fewer people will hear about it or see its value as high as you might. As such, don’t place any high hopes on your home selling quickly or for as much as you would with a realtor.

On top of all this, make sure to pay a little attention to the housing market before you jump in. You don’t want to end up posting your listing in the middle of a sharp decline and having to sit on the deed for years.

2. Getting the Price Right

Another important mistake to avoid is trying to sell the house for more than its worth (whether you’re valuing that due to sentimental reasons or wanting more money). This is a good way to scare off buyers.

Too low a price will bring buyers quickly to your door. However, if you discover you could have pulled more money out of the deal when you are midway through negotiations with a buyer, you’re out of luck.

A great way to counter this is to hire a house appraiser to come in and take a look at your property. They will give you a proper estimate of your house’s value so you know exactly how much to ask for.

3. Skimping on the Details

When it comes to selling a house, appearance is a massive piece of the puzzle. Deciding to take decent photos from your phone camera and post them with the listing rather than getting professional photos will turn away clients.

Make sure the property is clean and has good lighting too: anything you can do to make your house more attractive is good. That said, don’t fail to disclose any substantial problems the property has. That can land you in serious legal trouble.

Get Out and Sell That House

So, now that you have this guide on the three mistakes to avoid when trying to sell your house yourself, what steps can you take from here? Well, if you want to learn more about your options, you can right here! Plus, be sure to check out our website for more real estate news!

Filed Under: Tips

Home Selling Tips: 4 To Dos To Sell Your Home Faster

October 31, 2020

When listing a house for sale, no homeowner wants to see it sit on the market for months. You need to sell your home quickly in order to close that chapter and start a new one! How can you ensure your home sells fast and for a good price?

In the guide below, there are several home selling tips and tricks to help get your house off the market! If you’re ready to learn about these tips to sell your home fast then continue reading below.

1. Find a Great Agent

If you need your house to sell as fast as possible, then you should start by finding a great agent to help you sell it. Real estate agents sell homes for a living. They know how to advertise your house and how to bring buyers in.

They know all the tricks to get your home sold for the best price. Before hiring an agent, do your research. Look up reviews online, ask for references, and talk to friends and family.

2. Consider Selling As-Is

Another great way to sell your house quickly is to consider selling it as is to cash buyers, such as We Buy Properties. Cash buyers will come out and inspect your home. They’ll then give you a cash offer on the house as-is.

This means you won’t have to worry about making any repairs or upgrades to the house. This will also save you time not having to deal with lenders, since it’ll be paid for in cash.

3. Boost the Curb Appeal

Your house’s curb appeal plays a big role in how quickly it sells as well. The outside of the house is the first thing potential buyers see when they approach it. If the outside looks trashed, then buyers will assume the inside is as well.

Some buyer might not even stop to look inside if the outside is that bad. You can boost the house’s curb appeal by adding a new coat of paint, planting a garden and laying fresh mulch, and keeping the yard maintained.

4. Make High ROI Upgrades

There are certain upgrades you can make to a house to ensure it sells quickly, and you get your money back that you put into them as well. Completing different upgrades to your home might not always come out as a high return on investment (ROI). That’s why it’s essential to do your research and know what upgrades to make.

For example, updating the kitchen, bathroom, and replacing the roof are all high ROI upgrades.

Use These Home Selling Tips To Sell Your House Fast

When you’re ready to sell your home, you need these home selling tips and tricks to help you get it off the market fast and for a fair price. Be sure to look into each of these tips listed above and do the ones that you believe would work best for your situation.

For more posts on home topics, do visit on a regular basis!

Filed Under: Tips

This Is How to Get Started in Property Development

October 31, 2020

Real estate or property investment. Home mortgage loan rate. Saving money for retirement concept. Coin stack on international banknotes with house model on table. Business growth background

Property development is one of the most thriving industries in the country, with the U.S. real estate market size standing at an eye-watering $153 billion. If that’s not reason enough to entice you, the average annual base income for property developers in the US is a tremendous $85,845.

There are so many reasons to get into property development, like the possibility of making tons of money, but you need both ambition and patience. You should also be prepared to learn because even if you go through schooling, your first project will teach so much more.

Now to prepare you for all this, we have compiled all the information you need to know on how to start project management. Our guide will take you through all the steps and help you develop the best strategy on how to go about this.

What Is Property Development?

Property development is an umbrella term for a wide range of processes and activities. It involves purchasing land and developing or building facilities.

This is a continual configuration of building the environment to meet society’s needs. It is so broad that it covers everything from developing high-rise office buildings to building residential properties.

Some of the most important things you need to become a property developer are knowledge and expertise. You will have to educate yourself on the markets. Learn about the economics, the property, the construction process, and the marketing process. Most of the lessons are those you’ll learn along the way.

Understand that you’re likely to make a lot of mistakes during the first few projects. Essentially, this means that you should not give up at the beginning of your career for making mistakes you were not prepared for.

Talking to the Right People

Now that you’re ready to become a property developer, you need to discover your options and decide which aspect you would like to delve into. Talk to everyone, from real estate agents to finance strategists, accountant, town planners, architects, building contractors, development managers, engineers, and construction managers.

Go a step further and talk to quantity surveyors, marketing specialists, and property strategists. They will help you out with property development research and negotiations for properties.

Building a Team and Partnerships

As a property developer, understand that you will never work alone. You need your team of advisors and partners to see projects through to completion.

You need to have lawyers, consultants, and conveyancers that will ensure you comply with all regulations. You also need accountants and financial advisors. They’ll help you structure projects correctly to minimize taxes and maximize profits.

Building partnerships with real estate agents is essential because they will help you source for the right sites. Town planners will ensure you get all approvals and permits in the area of development.

Beyond that, you also need to broaden your network. Talk to experienced property developers, mentors, and industry experts. They will give you insights and advice about succeeding in the industry.

The Costs and Profitability of Project Development

As a property developer, you must factor in the property development cost and profitability before you start investing. You need to consider whether you can afford to undertake a development project.

Even more vital is to determine whether it will be worth your while. Establish how much money you can borrow and whether it will be enough to handle the kinds of projects you want to undertake.

It’s also incredibly important for you to have a finance pre-approval before you can start with any property development project. With this information, you will understand what your limits are and what you stand to gain in the end. When approaching lenders for financing, understand that they will have their own safety concerns.

A development project consisting of four to five dwellers will be considered commercial. Hence be more complicated to fund.

Most of the time, you’ll find that lenders are willing to finance only the hard costs. You’ll need to finance the soft costs like architecture and other consultation processes.

Create a Concept and Determine Feasibility

You’ll discover that different councils have different guidelines in their municipality. It’s essential for you to understand these guidelines and the principles of town planning.

Understand how each of them interprets the development code of the state you are developing in. In a nutshell, this means you need to do deep research before you purchase land.

It’s imperative for you to talk to all involved parties, including the town planner and a proficient architect. This will help determine what kind of property you can develop on a particular site. Never assume that you can develop similar properties to what to find in a municipality.

Those properties may have been approved under old town planning guidelines and regulations. One of the most critical aspects of property development success is securing the right property.

Site selection is highly critical to any project. Understand that it’s all about understanding the market and the current economic state.

You need to think about where the markets will be headed in the next few years of the project. Conduct a feasibility study to determine how much profit the project is likely to make. Not all property development projects will be financially feasible.

One of the most common reasons why most property developers go broke is because they purchase properties out of emotions. They fall in love with development sites and go with their gut. They fail to conduct comprehensive developmental feasibility studies, which leads to losses.

Getting Started With Property Development

Property development is an amazing career path, but only if you get it right. Follow these steps and do thorough research into all aspects before you get started. If you need more insightful information about real estate, please check out our blog section.

We have informative posts on health, lifestyle, budgeting, traveling and more. Please check us out today and we guarantee that you will not be disappointed in what you find!

Filed Under: Tips

3 Tips For Tackling A Whole House Renovation On Your Own

October 28, 2020

While buying a house can be an exciting time, getting a new home that you have to put a lot of work into can bring with it an extreme amount of stress as well. Additionally, if you already own your home but are wanting to give every room a new and updated look, you’ll likely be taking on quite a few renovation projects as well.

If this sounds like what you’re about to embark on in your life, here are three tips for tackling a whole house renovation if you’re wanting to do most things on your own.

Consider Meeting With An Architect

Depending on the extent of the renovation that you’re wanting to do, you might need a little guidance with your plans. However, if you’re wanting to do things as inexpensively as possible, you probably don’t want to hire an architect, contractors, or designer to help you with everything.

If this is the case, James Glave, a contributor to This Old House, suggests that you try consulting with an architect rather than hiring an architect to do a complete project for you. By working with an architect on a consultation basis, you’ll be able to save yourself a lot of money in addition to getting the insight and guidance that you need to ensure that your renovations are done safely and logically.

Clear Out Your House As Much As Possible

Once you have a clear vision on what you’re wanting to accomplish in each room of your home, it’s time to start getting ready for the actual renovations.

When you do this, Melina Gillies, a contributor to the Family Handyman, advises that you pack up all of your belongings from the room that you’ll be working on. Whether you move everything into another room in your house or you put it into a cheap self storage is up to you. But if you want to get your renovations done as efficiently and cleanly as possible, you’ll want to be working with a clean slate as opposed to having to work around all the possessions in that space.

Finish Projects Before Starting More

In the excitement of starting your home renovations, you might want to begin working on multiple projects at the same time. And while this might seem like a logical plan in some instances, Amanda Lauren, a contributor to Forbes.com, shares that it’s really best to complete one project before you start working on another one. Especially for things like your bathroom and kitchen, you really don’t want to go without those areas for too long, and focusing your efforts on that project until it’s completely done will allow you to move onto your next one as fast as you can.

If you’re about to take on a whole house renovation, consider using the tips mentioned above to help you prepare for all of these projects.


Filed Under: Tips

  • « Go to Previous Page
  • Page 1
  • Interim pages omitted …
  • Page 6
  • Page 7
  • Page 8
  • Page 9
  • Page 10
  • Interim pages omitted …
  • Page 21
  • Go to Next Page »

Primary Sidebar

About

Hi and welcome! I’m Lenny, and this blog space is my Internet home. I write, I cook, and I design. I love to take pictures of all things food and home décor.

Recent Posts

  • Exploring Bordeaux Through the Eyes of Senior Travelers
  • 3 Signs Assisted Living Is Right For Your Older Parent
  • E-commerce Store Budget: 3 Tips for Beginners
  • 3 Tips For Setting Boundaries With Your Adult Children
  • 4 Biggest Mistakes People Make When Buying Property

Let’s Connect

  • Facebook
  • LinkedIn
  • Twitter

Latest

Exploring Bordeaux Through the Eyes of Senior Travelers

3 Signs Assisted Living Is Right For Your Older Parent

E-commerce Store Budget: 3 Tips for Beginners

3 Tips For Setting Boundaries With Your Adult Children

4 Biggest Mistakes People Make When Buying Property

Footer

About

Hi and welcome! I’m Lenny, and this blog space is my Internet home. I write, I cook, and I design. I love to take pictures of all things food and home décor.

LatestPost

  • Exploring Bordeaux Through the Eyes of Senior Travelers
  • 3 Signs Assisted Living Is Right For Your Older Parent
  • E-commerce Store Budget: 3 Tips for Beginners
  • 3 Tips For Setting Boundaries With Your Adult Children
  • 4 Biggest Mistakes People Make When Buying Property

Let’s Connect

  • Facebook
  • LinkedIn
  • Twitter

Copyright© 2025 · Dear Theme by Shay Bocks