• Skip to main content
  • Skip to primary sidebar
  • Skip to footer

Skipping Stone Design

Skipping Stone Design

  • Home
  • About
  • Health
  • Lifestyle
  • Tips
  • Budget
  • Travel
  • Contact

Lenny

Properties and Benefits of Oak – and Why Restoring Oak is an Excellent Decision

August 10, 2020

Oak has always been popular for use in different structures, and its properties make it a particularly valuable element that can increase the value of any property. Did you know that there are more than 600 kinds of oak trees found in the northern hemisphere, and most of these are suitable for use as timber? Two particular species are often found in the European continent as well – Q. petraea and Q. robur. These species of oak have been widely used for centuries, especially for the making of furniture, decorative elements, and architectural or structural supports (such as oak beams). If you have oak wood in your home – whether in the form of beams, furniture and more – it pays to preserve it so you can enjoy it for years to come. Here’s more on what you should know about oak wood properties and benefits – and why restoring oak is always an excellent decision.

C:\Users\Admin\Downloads\post-2232962_1920.jpg

Oak properties and characteristics that make it incredibly valuable

  • Flexibility – oak has an innate strength and obvious physical appeal, which makes it ideal for various purposes. A typical oak tree can grow to a great height, and this means that it can produce a lot of timber indeed. The timber’s length makes it even more suitable for exterior cladding and flooring and beams. If you use oak for your property, the work can be more quickly and effectively finished simply because you need fewer pieces. And since oak is relatively uniform in grain and colour, it gives you a highly-consistent finish.
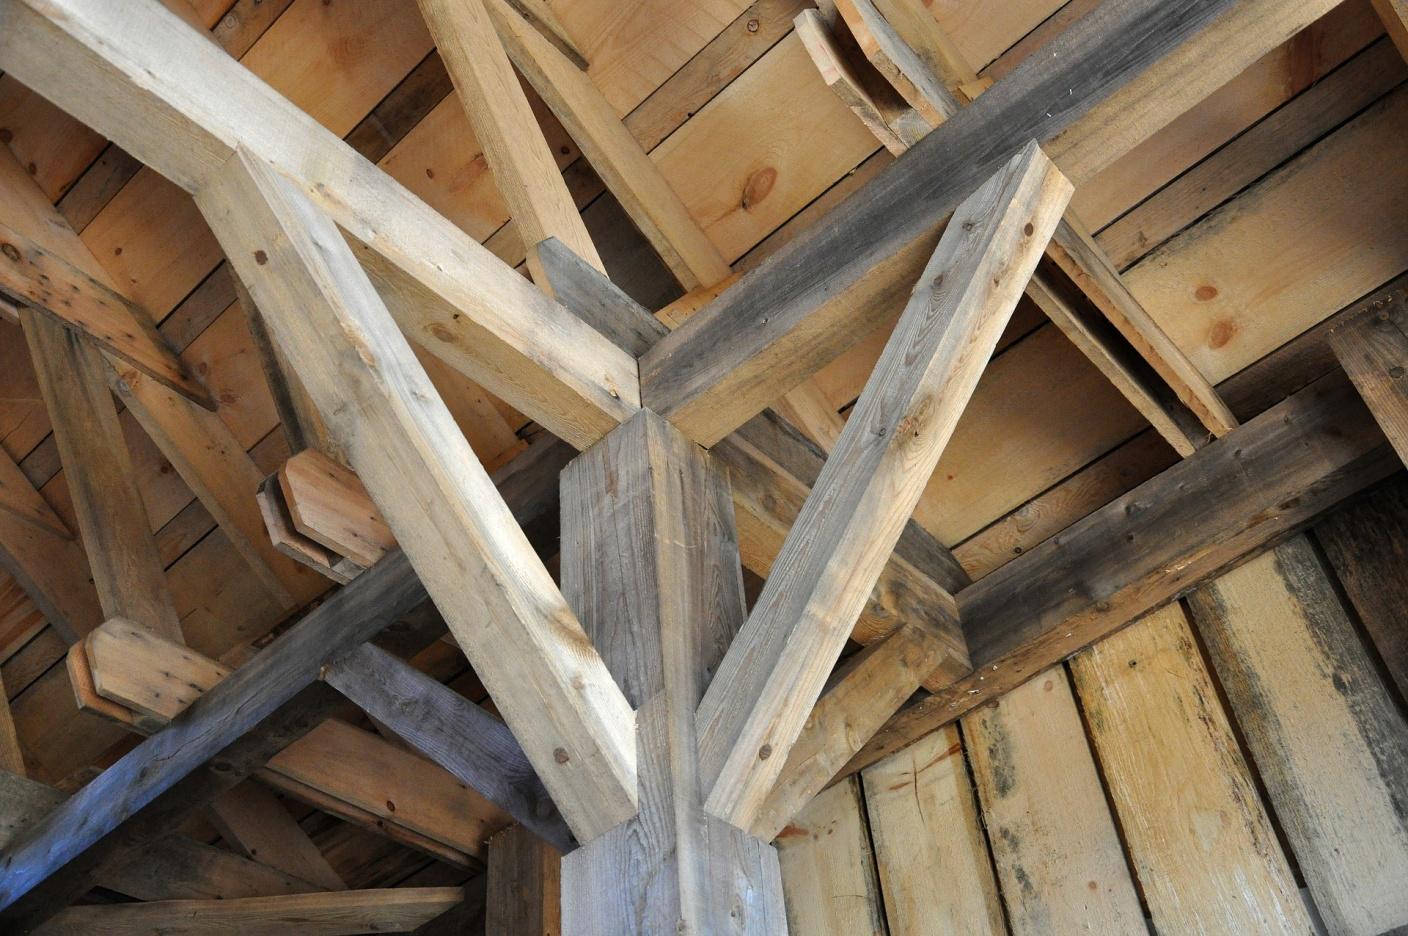
  • Durability – as you may already know, oak is immensely hardy and durable – if you have oak beams, then you can definitely see for yourself how durable those oak beams are, even if they are already decades old. Numerous buildings framed in oak and built centuries ago are still standing today, and this certainly proves how long oak can last. Oak inherently contains a high percentage of tannin, making it amazingly resistant to fungi or insects. Unlike other kinds of wood, oak is not as likely to rot or decay. When you use particular drying methods that remove moisture within the wood, the timber produced is more weather-proof than most and doesn’t require extensive chemical treatment, if at all. Oak is also less likely to shrink or warp compared to other kinds of wood.
  • Aesthetic appeal – without a doubt, oak is aesthetically pleasing to the eye. This is one of the vital reasons why it remains a desirable timber; it has a naturally pleasant goldish color that dries to a silvery hue and tone eventually. It also has visible graining, which doesn’t require waxing or staining to emphasise it. The texture of oak also makes it attractive, especially to home and property owners who are looking for a natural wooden sheen.

If you have old oak beams, old oak furniture, and the like, you should take extra care to preserve it. Old oak beams, in particular, are very attractive and can lend a uniquely appealing look to the interior of a building. If your old oak beams need to be renovated or restored, there are beam renovation specialists who can provide you with their expertise and can bring back the beauty and appeal of the wood – and it’s definitely worth it.


Filed Under: Tips

How to Clean Ceiling Fans: A Simple Guide

August 6, 2020

Do you want to know how to clean ceiling fans? During this lockdown period, it can be vitally important to keep your home as clean as possible. If you don’t then you could end up getting ill from the dust circulating in your room.

How should approach how to clean ceiling fans so that your cleaning is effective? Here’s everything you need to know.

Why Clean?

You might ask what’s the point in cleaning your ceiling fan? Indeed what’s the point in cleaning anything? If fans gather dust – and let’s face it they usually gather more dust than most appliances by being out of reach – then they start to infect the air that you breathe.

If the air is full of dust particles it can start to affect your breathing and can even lead to increased allergies. During these difficult COVID times it’s more important than ever that we keep our respiratory health in top shape.

With lockdowns meaning, we are spending more time inside than ever before there’s never been a more important time to ensure our homes are clean.

Safety First

The most important thing you need to consider when cleaning a fan is safety. First of all, ensure the power is turned off. You don’t want to risk electrocuting yourself. Double-check that your fan is off before you begin work on it.

You might also need to get a ladder to clean your fan. If this is the case take proper safety precautions first. Only use a small step ladder. Ensure that it is secure before you climb it. You might also want to consider taking a course on how to use a ladder safely.

If you have another person in the house then consider getting them to stand by it to hold it in place. It’s also worth having another person nearby in case you were to slip and fall. They can ensure you receive medical attention straight away.

Consider Using an Extendable Duster

If you don’t want to use a ladder then consider getting an extendable duster. You can only use one of these if your ceiling is low enough or your fan is not too difficult to clean from a distance.

You might want to use an extendable duster for a quick more regular clean but every now and then it’s important to climb up high and check over your fan to give it a deep clean. This is ceiling fan maintenance.

Get Spraying

Another technique you can use to make sure your fans are clean is a dusting spray. This spray can help you clean up the dust with no problem.

These sprays are usually full of pressurized air and can be useful for getting rid of thick dust that might stay on the surface even after you have given it a clean with an extendable duster or cloth.

Hire a Cleaner

Of course, if you don’t like cleaning your fan or you’re no good at it then you can hire a cleaner. The question of how often you clean your fan or hire a cleaner to do it for you can be tricky but a cleaner might have the answer.

They might charge more during the current pandemic and you may need to practice social distancing but they can be a great investment and you can ensure they do the job properly.

Always wear a mask and make sure your cleaner wears a mask. This is not just about the current pandemic, you should wear one even when the coronavirus has completely disappeared so that you don’t inhale the dust particles.

Look online on professional cleaning sites to make sure you hire a cleaner who will do a good job rather than just hiring a friend or someone who posted on Facebook.

Be sure to ask them what their hourly rate is and whether they can spend some specific time on cleaning your fan.

Clean that Motor

The most important part of the fan that you need to clean is the motor. This is the part that can stop the entire fan from working if it gets clogged up with dust. Do not attempt to clean this on your own. You should also stop your cleaner from touching it either.

Instead, you need to call on a special expert to help you clean the motor. They can dismantle the entire fan and clean the motor and all the rotor blades as well. You can be on standby to assist them if necessary but it is the expert themselves who should be doing the cleaning itself.

Start by looking for the manufacturer of the ceiling fan itself. Perhaps they can send someone over to help you or recommend a licensed engineer to help you. Failing this you can begin searching on Google or asking friends for recommendations as to who to call to come and clean your ceiling motor.

If you have a noisy ceiling fan they might also be able to fix it to enable it to run more smoothly.

How to Clean Ceiling Fans? Clean Regularly

If you’re thinking about the best way of how to clean a ceiling fans then the answer is to do it regularly so that the dust doesn’t build up. You should also consider hiring an expert every few months to come and clean the motor and check it over.

If you are interested in reading more great content be sure to check out the rest of our site.

Filed Under: Tips

Vinyl vs Hardwood Floors: A Comparative Guide

August 6, 2020

How would you like your new floors to look? Do you want the warmth and value of a hard floor? Or would you like the options and durability that a vinyl floor gives you?

Read on to learn the pros and cons of vinyl vs hardwood.

What Is Hardwood Flooring?

Hardwood comes in two types: solid and engineered. Though they look similar, slight differences in durability and cost give you different options.

Solid Wood

Solid wood flooring planks are 100% solid wood, made from a hardwood species such as maple, oak, or walnut. Since the flooring is solid throughout, it can be sanded down and refinished several times, and may last up to 100 years.

Engineered Wood

Engineered wood flooring is made from a thin layer of hardwood bonded to a layer of plywood. It can be cheaper than solid wood and can last up to 30 years. However, you can only refinish it once, since too much sanding will remove the hardwood layer to expose the plywood.

What Is Vinyl Flooring

Vinyl flooring is made up of several layers including backing material, core, design layer, and wear layer. 3D printing makes it possible to produce almost any look and texture. Since homeowners are moving towards hardwood and stone, these trends are encouraging the production of vinyl that resembles wood, stone, or classic tile.

Vinyl vs Hardwood

When you’re considering vinyl flooring vs hardwood, think about cost, looks, or maintenance needs. Each substance has its own advantages.

Cost

The price of solid hardwood ranges from about $4 to $12 per square foot, averaging about $8 per square foot. Engineered hardwood costs slightly less, with a range between $2.50 and $10 per square foot, and averaging between $4 and $7 per square foot. Installation labor adds about $3 to $10 per square foot to the job.

Vinyl costs between $2 to $8 square feet, a price which includes installation. This means that a vinyl floor can cost at least 50% less than a hardwood floor.

Environmental Impact

Domestically produced wood usually comes from managed forests, making it a sustainable resource. You can even find reclaimed wood, such as barn wood, that has been reclaimed from other projects. Check for the logo of the Forest Stewardship Council (FSC), which certifies wood based on forest management and worker’s rights, especially if you buy wood from other countries.

While vinyl is a petroleum-based product, it also has environmentally-friendly advantages. Its durability means that it doesn’t have to be as frequently replaced as other forms of flooring such as carpet. Some vinyl is even made from recycled materials.

Location

Since wood flooring seems more elegant and lasts forever, you may want to use hardwood in a main room or a highly visible area. Moisture will damage a hardwood floor, so you may not want to use hardwood in an area that needs to be cleaned frequently, or a room such as a bathroom that might flood. Do not install hardwood directly over concrete.

Since it is waterproof and easy to maintain, you may want to choose vinyl for an entry, a mudroom, or a bathroom.

Maintenance

Both wood floors and vinyl floors are easy to clean. You can sweep or vacuum either vinyl or hardwood. Vinyl can be soaked and scrubbed, while hardwood can be cleaned by damp-mopping with a wood cleaner but should not be soaked.

Install Your Floor

When you’re choosing vinyl vs hardwood, do you want a  floor that is elegant, functional, durable, or easy to maintain? Whichever you choose, you can find something that is right for your home.

If you enjoyed reading this, check out our blog for more interesting articles.

Filed Under: Uncategorized

3 Tips When Choosing a Water Damage Restoration Company

August 6, 2020

Over 37% of homeowners have experienced damage caused by flooding. This flooding can be caused by things like leaking plumbing pipes or forces of nature. When faced with flooding issues, your main concern needs to be getting them fixed in a timely manner.

Removing water from your home and fixing any damage it has caused is a job best left to water damage restoration professionals. With all of the different water damage restoration companies operating on the modern market, finding the right one to hire will be difficult.

Are you trying to hire professionals to remove water from your home? If so, consider the helpful tips below.

1. Assess the Services Offered by a Water Damage Restoration Company

Some homeowners think that simply removing water from their flooded residence is all it takes to fix this problem. In reality, standing water in a home can cause lots of damage, which is why working with professionals is so important. As you start to research the various water damage restoration services in your area, be sure to assess the types of services each one offers.

Ideally, you want to find a company that offers mold remediations, carpet cleaning, and water extraction services. Finding a company that offers all of these services will remove some of the stress and frustration associated with cleaning up a flooded home.

If you do choose a company that has to subcontract out parts of this job, be sure to find out more about the individuals they are hiring. The more you know about the process a company uses to address water damage, the easier it will be to avoid problems.

2. Choose a Company With Extensive Experience

Removing water from a flooded home and mitigating the risks this moisture can cause is difficult. Without the right amount of experience and professional-grade equipment, getting the water out of your residence will be impossible. Making sure the company you are thinking of hiring has extensive experience with water damage restoration is a wise move.

Choosing a company that is relatively new and unproven can come back to haunt you in the future. The money paid to a water removal expert will be worth it considering the problems they can help you prevent.

Taking the time to go online and look at the reviews for a water damage restoration company is crucial. With this information, you can figure out whether or not a particular business is the right fit for your needs.

3. Schedule Multiple Consultations

Most water damage restoration companies offer consultations to potential customers. During these consultations, you will be able to find out more about a company and what they will charge for the job at hand.

While participating in multiple consultations will be time-consuming, it is worth the effort. The information from these consultations allows you to make an informed decision regarding which company to hire.

It’s Time to Find a Water Damage Restoration Company

As you can see, finding the right water damage restoration company is not easy. Researching all of the companies in your area is essential when trying to make the right hire.

Are you looking for more information on handling common home repairs? If so, check out the rest of our blogs.

Filed Under: Tips

The Common Types of Commercial Lighting Explained

August 6, 2020

Poor lighting is one of the major causes of injuries in the workplace. Recently, a worker in Long Island, New York received a $440,000 settlement. He suffered a fall at a construction site due to poor lighting conditions.

Without adequate lighting, the risk of serious and sometimes fatal accidents is higher. Not only that but it can also affect the quality of work and the overall productivity of the employees.

Lighting plays a vital role in creating a safe and comfortable workplace in commercial and industrial buildings. There isn’t just one type of commercial lighting though. You can’t just choose the brightest type available because glare is also a health hazard.

To find out more about the different commercial lighting types, please continue to read the rest of the article.

1. Fluorescent Commercial Lighting

Fluorescent lights are one of the most popular for commercial establishments. They’re long-lasting (12,000 to 24,000 hours) and very energy-efficient. They are the number one choice for retail stores where you typically leave the lights on 24/7 for security purposes.

You’re probably familiar with the tubular type which comes in different sizes such as T5, T8, or T12. T stands for “tubular”, while the number refers to the diameter. T12 has been around the longest and is often seen in low-bay areas such as offices or restrooms.

T8 and T5 have superseded the T12 because they have more advanced electronic circuits. They use less energy than T12s while outputting the same or greater amount of light. T5 fluorescent is best for high ceilings while T8 can be used for both low-bay and high-bay applications.

Fluorescent lights also come as compact fluorescent which you might recognize as the spiral light bulb.

2. High-Intensity Discharge (HID)

HID lighting comes in three variations: mercury, metal halide, and high-pressure sodium. The presence of these gases increases the intensity of the light created. Although they take a few minutes to reach full brightness, they’re very adept at lighting large areas.

Like fluorescent lights, they have good efficiency and durability. They’re commonly used for high-bay areas and outdoor lighting. You’ll find that hiring an outdoor lighting contractor to install these lights for landscape lighting is well worth it.

3. Light-Emitting Diode (LED) Commercial Lights

LED lighting is increasing in popularity for commercial applications and with good reason. They’re often the most efficient option and can outlast other types of commercial lights. You can save a lot of money from energy savings and decreased operating costs.

Another advantage is that unlike fluorescent or HID, LEDs don’t contain toxic chemicals. What’s more, you can get all these features without sacrificing the quality of light.

LED is very versatile and can replace existing fixtures if you’re looking to upgrade. You also have the option to retrofit your current fixtures.

Despite the advantages, LED fixtures are still expensive. They’re still a good investment and many LED systems can pay for themselves in a period of two years.

Keep the Lights On

Choosing the right type of commercial lighting is vital for the sustained operation of your business. The benefits include reducing your energy costs and keeping your employees safe and productive.

For more design tips, feel free to browse through our website.

Filed Under: Uncategorized

Pool Maintenance 101: Everything You Need to Know About Pool Care

July 31, 2020

There’s nothing more exciting than taking a dip in a sparkling pool on a hot day! Pools provide tons of family fun. We love those pool games!

Pools offer the perfect addition to backyard barbecues. And swimming in your pool helps relax your aching muscles and provides great exercise.

But to keep your pool looking beautiful and operating at top efficiency, you need proper pool maintenance. In this post, you’ll learn essential tips for correct pool care.

Whether you’re a new homeowner and installing a new pool or want to take care of your existing pool, here’s what you need to know about maintaining your pool. Let’s dive in!

Get Your Pool Serviced Regularly

Thinking of installing an above ground pool DIY? Before you decide, know the top pool installation mistakes to avoid. Even so, it’s important to hire a professional to service your pool once a year.

You can maintain some typical pool duties on your own if you have the time or interest. But certain tasks should be left to a professional pool company.

While you can do some regular maintenance we’ll discuss in this article, professionals ensure your pool systems work properly. The systems they’ll check include the following:

  • Correct operation of pumps
  • Proper filtration of your pool filters
  • Efficient heating systems

Don’t attempt these tasks on your own unless you’re a trained professional. Know that pool specialists possess the knowledge that will ensure your pool’s efficient operation and prolong the life of your pool.

Consistently Check the Water Quality

The first step to maintaining your swimming pool is testing the water quality. To do this, you need to add the proper chlorine levels to your pool.

The proper chlorine levels fight off bacteria that could form in your pool. Ensure the levels are consistent every time you test the water quality.

This is one of the most critical things you can do for your pool because it makes your pool safe for you and your family. Make sure to check the chemicals at least once a week in the summer or when the pool is in use.

Do you live in a state like Florida when you can swim in your pool during multiple seasons? Then you’ll need to check it weekly.

You may find you want to check it twice a week. This may depend on the wildlife and natural environment surrounding your pool.

Also, check the pool’s chemical Ph levels every two weeks at least when it’s not in use. Improper Ph may build up calcium in and around your pool or cause other issues. Your pH should measure between 7.42 and 7.68.

Clean Your Pool Filter

When it comes to correct pool maintenance, a clean filter is key. You don’t need to clean the filter as frequently as you check your pool’s pH level, but it’s still important to ensure your pool works properly and looks clean.

Make sure to check the filter after inclement weather. A hurricane or heavy rainfall can bring extra debris into your pool. Otherwise, you can safely check your filter every three months.

How to Clean Your Cartridge Filter

Want to clean your cartridge filter on your own? Then follow these steps:

  1. Slip into a pair of long rubber protective gloves.
  2. Get some goggles to protect your eyes.
  3. Fill a large container or trash can with 90% water but leave room on the top.
  4. Then add a 10% solution of Trisodium phosphate or muriatic acid to the trash can. Seriously protect your skin and eyes. These are strong chemicals.
  5. Soak the cartridges in the solution
  6. Remove them when they look clean.
  7. Place them in an area to dry.

Empty All the Baskets Around Your Pool

Your pool houses a variety of baskets and collection containers. The first one to check is the container near the pump. Clean the hair and lint out of it. This may be enclosed in a glass container.

Before you do anything, turn off the pump. Then let out the pressure. Do this every couple of weeks. You may want to do it more often, especially if your pets swim in the pool.

When you’re done with the pump container, walk around the pool and empty the other baskets around such as the leaf basket and skimmer basket.

Skim The Surface and Scrub the Sides of Your Pool

We love a clean pool! But it takes a little work. Sometimes when we get busy, we forget to skim our pool. But it shouldn’t be neglected. It’s easy to see leaves scattered around the surface of our pool and ignore them.

Walk around your pool with a skimmer every day and empty and discard the leaves. You also need to scrub the sides of your pool with a brush to keep your pool siding in top condition.

See any algae forming on the sides of your pool? Make sure to scrub it immediately before it grows.

Preparing for the Off-Season

Follow these steps to close up your pool. They will keep everything running in prime condition until you reopen your pool.

  • Test the water before you close the pool
  • Remove additional water from your plumbing lines
  • Put on your pool cover snugly to keep out debris during the off-season.

Taking these steps will ensure your pool is ready to go during the season. It will also avoid potential pool problems that could put a damper on your pool fun (and your wallet).

Pool Maintenance Tips Roundup

Follow these pool maintenance tips to proper pool care and don’t forget to call in a pro to check your pool’s systems. With proper pool cleaning and maintenance, you’ll enjoy years of fun and relaxation in your new swimming pool. Marco Polo!

Looking for more expert tips about your home? Explore more content on our blog.

Filed Under: Uncategorized

3 Tips For Creating A Website For Your Small Business

July 31, 2020

If you’re just starting with a new small business, one of the first things you’re going to want to take care of is setting yourself up a new website. Not only will your website we used to get in touch with current and prospective customers and clients, but you can and should also conduct your business through your website. And for those who aren’t yet working with you, a strong website can help them make the decision to use your products or services in the first place.

To help you set something up that’s going to be a true benefit for your new organization, here are three tips for creating a website for your small business.

Find The Right Web Hosting Service

Before you really start working on your website, you’re going to need to find the right web hosting service to host your website and act as your go-to if you have questions or problems with the functionality of your website and how it interacts with the Internet.

According to Allison Bowlus, a contributor to AllBusiness and Forbes.com, one of the best options for a young business that’s looking to grow is to use a virtual private server. This hosting service will give you the hosting services and security you’ll want for your website without having to pay a huge monthly fee that many startups can’t really afford.

Design For Easy Use

Now that you have your web hosting figured out, you’ll want to focus your attention on designing a great website that’s going to be easy and intuitive for your visitors.

When aiming for easy use and navigation, Kelly Main, a contributor to Fit Small Business, recommends that you start by setting up a sitemap so you can see how you want your navigation to be laid out and what pages you’ll have connected to each other in a hierarchy. This can make it much easier for you to plan how visitors will move through your website and eventually convert.

Make Contacting You Effortless

Despite all your efforts to get everything taken care of with your new website, there’s a great possibility that you’ll forget some information or not have all the details that some visitors will be looking for. In these situations, you’ll want to make it easy for your visitors to contact you.

While you can include your phone number or email address, Syed Balkhi, a contributor to Entrepreneur.com, recommends that you make this even more effortless by using a contact form or a chat service. Taking these measures can make your visitors more likely to get in contact with you when they need something, which can quickly turn them from visitors to customers.

If you’re about to start a new website for your new business, consider using the tips mentioned above to help you get everything set up correctly.

Filed Under: Tips

Home Exteriors: 4 Must-Know Tips for Improving Curb Appeal

July 26, 2020

Regardless of how busy the housing market gets, selling a home can be a long process. One thing that helps a lot: improving curb appeal.

As a general rule, homes with great curb appeal fetch higher prices. The secret lies in providing a good first impression. Studies show that people gain impressions of objects after a few seconds, and these initial ideas are hard to shake off.

Not sure how to improve the curb appeal of your home? Here are 4 effective tips that should help you out!

1. Clean the Exterior

Before doing anything else, you should wash your home exterior. A thorough washing – a couple of weekends’ worth – can remove years of dirt and dust. All you need is one pressure washer, a long-handled brush, and a bucket of soapy water.

If this doesn’t make your walls shine, you may want to repaint them. This isn’t a low-budget option, but it can be worth its weight in gold. If you can’t afford a complete paint job, consider focusing on the trim.

2. Manicure the Lawn

Proper landscaping is another thing that can make a big difference in curb appeal. That said, you don’t want to go overboard. A simple yard facelift will only set you back a few hundred dollars while increasing the home’s value by 5-10%.

Focus on trimming the trees, pruning the shrubs, and making sure the grass is neat. If you notice any dead patches, replace them with sod from a local department store. Pulling up weeds, removing foliage, and putting down more mulch also helps a lot.

3. Inspect Your Roof

Does your roof have curled, faded, or missing shingles? If so, that can have a significant impact on your home’s value. You may not think about your roof too often, but this is one of the first things potential buyers will notice.

This is why repairing your roof is one of the best ways to increase curb appeal. You may also be able to get away with just a thorough cleaning, which could set you back about $1,000. For more information, contact a professional roofing contractor.

4. Add More Style

Curb appeal isn’t only about repairing what you have. Knowing how to add curb appeal can go a long way toward expressing your home’s personality. Keep in mind that buyers are more likely to go for a home they can picture themselves in.

For example, most front doors are boring to look at. Why not add a burst of color by painting it red or even replace it with a rustic wood door? You can also install a gray picket fence, add a new mailbox, or lay down an interesting welcome mat.

More on Improving Curb Appeal

These days, most home buyers start their journey online. Many of your prospective buyers will decide whether to drive by your home based on what they’re able to see from the street. The above tips can help you impress them.

Want to know more about improving curb appeal? Interested in making the most out of your driveway or concrete patio? Check out our Lifestyle section!

Filed Under: Lifestyle

9 Ways to Make Your Garden Fun

July 23, 2020

An outdoor garden is a great way to encourage children to spend time outside and learn about nature. If your home has the space to build a garden, then you’ll want to create one that you and the entire family will love. Although at first, a garden might seem like something only an adult would benefit from, once you start creating it, you’ll learn that there are plenty of fun garden ideas.

How can you ensure you make your garden fun?

Imagine a magical world where bright and colorful flowers fill your eyes. There’s a mystery around every corner and critters of all sorts run the paths with you. Sounds enchanting, doesn’t it?

You can build this very place for your little ones. The end result is a stunning garden that your children will never want to leave. Continue reading below to find out about a few different ways to make your outdoor garden fun!

1. Allow the Imagination to Run

A place where the imagination can run wild is a place where your children want to be. It’ll make a neat place for you as well. When building your garden, consider laying down paths that curve into unseen areas.

Build garden walls from vines and lattice to separate different sections in the garden. If you want to see what’s behind the walls, you’ll need to follow the path. When your garden has a couple of these areas, your children will become obsessed with exploring, discovering, and imagining.

2. Install a Swing or Hammock

There are many furniture items that you can add to your garden. A swing, a hammock, or even a small pool will work well. The best above ground pools can be installed and then blended into your garden’s atmosphere.

A hammock is a great way to relax in nature after running down all the winding garden pathways. If you have a seating area in your garden for the adults, then be sure to install a few swings near the seating area.

As the adults sit at the table, the children can swing on the swings.

3. Create Grow Stations

Children are naturally curious. They’ll love having different grow stations in the garden. Use raised garden boxes to grow several different things.

You can have one grow station where you grow vegetables, one for a fruit, and one for a favorite flower. Start the plants off as seeds. Plant them with your little ones, bring them out to the garden to water and tend to them.

As the plants grow, the children will love to see the progress, and getting to snack on a sweet berry at the end is always a plus as well. This is also the perfect opportunity to teach them about gardening and agriculture.

4. Build Hideaways

What child doesn’t love a good hideaway? There’s something about hidden away nooks that children just can’t get enough of.

You can create hideaways, forts, or tents with the use of bamboos and vines. Place bamboo sticks in the ground in a circle shape. Leave a small section open.

This is how your children will crawl in and out. Then, secure the tops of the bamboo with garden twine. To make the hideaway more green and full, you can plant sweet peas and other beans and plants that climb on the outside of the structure.

Over time, they’ll grow around it, making a neat hiding spot.

5. Find Ways to Invite Critters

Critters love gardens. Gardens provide shelter and food for many small creatures. You will, however, need to have a good balance of all the right critters.

Some critters are beneficial to your garden, while others can damage it. Look into the type of plants you’re growing and see what types of critters you need to attract to keep it healthy.

You can also place a birdbath and birdfeeder in the garden to bring all sorts of birds to your home. Your children will love watching the critters and interacting with them.

6. Use Tree Stumps as Stepping Stones

The more natural you can keep your garden, the better. Find a narrow area where you can place tree stumps down. Use tree stumps of all different sizes both width and height.

Place them in a line. Your children will have fun stepping on them and jumping from one stump to another. If possible, have the stumps lead to a specific area in the garden, like a small buttery garden section.

7. Incorporate Play Equipment Into the Design

Average play equipment can be used in your garden as well. If your garden is on a slope, then you can install a slide that leads from the top of the slope to the bottom.

You can also create tunnels using sheets of metal hidden under the terrain. Create a playground or a natural jungle gym inside your garden, and the children won’t ever want to leave.

8. Plant a Sensory Garden

A sensory garden is a great idea for the little ones. What flowers can you plant that’ll light up their eyes, entice their nostrils, encourage them to feel different textures, allow them to taste new things, and bless their ears with natural sounds when the wind blows through?

Find a plant, flower, or veggie that’ll help them engage in one of their senses and have a plant for each sense. This is how you build a sensory garden.

9. Lay Mosaic Tiles as Game Pieces

Mosaic tiles are bright and colorful and can even work as game pieces in your garden. Find a path and lay down a few mosaic tiles as stepping stones.

Each stone can have a bright number on it. Place them in order and create a hop-scotch playground for the little ones.

How Will You Make Your Garden Fun for the Family?

Which fun ideas listed above will you use to make your garden fun for the entire family? Take an idea straight from this list or let some of these items inspire you to come up with your own.

For topics about the home, be sure to check back with us regularly!

Filed Under: Uncategorized

5 Tips for Investing in Your Kitchen

July 23, 2020

Kitchen remodels a significant investment for your home, and renovations can range from $10,000 up to $50,000 or more. If you are looking for a modest repair or total upgrade, you need to understand the budget for your kitchen renovation. Below are five tips for investing in your kitchen.

1. Determine Your Max Budget and Stick to It

Before beginning your kitchen renovation, you need to make sure you know the total amount you can spend. Everyone has a Pinterest idea of their dream kitchen, but you also need to be honest about how much you can afford on the kitchen upgrade.

If you have plans to sell your home in the future, your renovation should be focused more on an investment, which means that your budget for your renovation should accommodate items that will give you the most significant return on investment.

To stick to a budget, you need to thoroughly plan and be prepared for the unexpected that can happen, such as asbestos or lead, which need to be tested and carefully removed.

2. Do Your Homework First

Kitchen renovations can be complicated, and there are many questions you will need to ask before getting started, such as:

  • How do you plan to use the kitchen? Does your family eat out a lot? Or do you love entertaining and cooking? It would help if you designed your kitchen layout for the use of the kitchen.
  • How many people use your kitchen at a time? The layout of a kitchen is vital in design and planning. If you have a big family, you want a kitchen that feels open and can accommodate a lot of people gathering around.
  • What type of food do you eat? If most of the food you eat is a fresh food, then you do not need a large pantry, you should invest in a larger refrigerator, instead of a bigger pantry.
  • What are your kitchen must-haves? You need to know your must-haves, such as a farmhouse sink. You should budget for your must-haves first. Keep a nice-to-have items list in the back of your mind so you can plan accordingly for these items.

If you are making last-minute changes during the renovation, you will quickly increase the cost of your kitchen remodel. It is important to have a good plan and research layouts, material, etc. to be more prepared.

3. Choose Your Materials Wisely

Choose the materials on your own. Shop around for your big items that typically cost the most, such as cabinets, countertops, flooring, and appliances.

  • Cabinets – pricing for cabinets can vary, its essential to not make rational decisions, take your time to find quality cabinets that are in your budget.
  • Countertops – this is another item in the kitchen renovation that can vary greatly. Quarts or granite are extremely popular but are expensive. Shop around for other options that are equally as good but might fit your budget better.
  • Flooring – prices range depending on the flooring you want to install or materials you wish to use, such as hardwood or tile.
  • Appliances – get quality appliances that look nice, function, without being over the top.

4. Please get to Know Contractor Before Hiring Them

Before you decide on a contractor, you should follow things considered:

  • You know the rough layout you want for your kitchen. Email your design to contractors to give them a visual of the work you want to do. Assigning a contract a plan of your design can help with them predicting timelines and giving a more accurate quote on the job.
  • You supply the materials. Make sure you have the materials you want to use. Having them beforehand can help with the contractor completing the project on time. Providing your own materials will also save you contractor prices and can help keep your budget down.
  • You understand the scope of work. It is essential to know how much work essentials are for communicating with your contractor. For example, you might only want cosmetic updates and do not want to change the layout of your kitchen.

5. Do Some Work Yourself

If you are able, you can help save money on your budget by doing some items in the remodel yourself. Kitchen renovations can be extremely complicated, but maybe save money on the painting by painting walls and trim yourself. Also, look at replacing cabinets or doors, painting, or replacing floors. If you have some experience, these are some jobs you can do yourself to help save money on the kitchen renovation.


Filed Under: Budget

  • « Go to Previous Page
  • Page 1
  • Interim pages omitted …
  • Page 27
  • Page 28
  • Page 29
  • Page 30
  • Page 31
  • Interim pages omitted …
  • Page 48
  • Go to Next Page »

Primary Sidebar

About

Hi and welcome! I’m Lenny, and this blog space is my Internet home. I write, I cook, and I design. I love to take pictures of all things food and home décor.

Recent Posts

  • Exploring Bordeaux Through the Eyes of Senior Travelers
  • 3 Signs Assisted Living Is Right For Your Older Parent
  • E-commerce Store Budget: 3 Tips for Beginners
  • 3 Tips For Setting Boundaries With Your Adult Children
  • 4 Biggest Mistakes People Make When Buying Property

Let’s Connect

  • Facebook
  • LinkedIn
  • Twitter

Latest

Exploring Bordeaux Through the Eyes of Senior Travelers

3 Signs Assisted Living Is Right For Your Older Parent

E-commerce Store Budget: 3 Tips for Beginners

3 Tips For Setting Boundaries With Your Adult Children

4 Biggest Mistakes People Make When Buying Property

Footer

About

Hi and welcome! I’m Lenny, and this blog space is my Internet home. I write, I cook, and I design. I love to take pictures of all things food and home décor.

LatestPost

  • Exploring Bordeaux Through the Eyes of Senior Travelers
  • 3 Signs Assisted Living Is Right For Your Older Parent
  • E-commerce Store Budget: 3 Tips for Beginners
  • 3 Tips For Setting Boundaries With Your Adult Children
  • 4 Biggest Mistakes People Make When Buying Property

Let’s Connect

  • Facebook
  • LinkedIn
  • Twitter

Copyright© 2025 · Dear Theme by Shay Bocks