• Skip to main content
  • Skip to primary sidebar
  • Skip to footer

Skipping Stone Design

Skipping Stone Design

  • Home
  • About
  • Health
  • Lifestyle
  • Tips
  • Budget
  • Travel
  • Contact

Lenny

Curb Appeal: 5 Best Tips for Exterior House Cleaning

July 6, 2020

Are you looking for different ways to improve the curb appeal of your home? Do you want to make it stand out more than the rest of the homes in your neighborhood?

If so, then you’ll need to learn the tricks behind a thorough exterior house cleaning. It can help make your home appear as though it’s brand new. You’ll notice those that pass your house often take second glances to admire the cleanliness.

If you’re planning on doing an exterior house cleaning soon, be sure to see below for several tips that can help you do just that. Take all of these tips into consideration.

1. Pressure Wash Essential Areas

If you’re looking to make your home appear as though it’s brand-spanking-new, then pressure washing will help you do that in several areas. It can be used to clean your home’s siding, decks, and driveways.

To do that effectively, you need to find a power washing service that will come in under your budget for your home cleaning project.

Start by taking the pressure washer to your home’s siding. Wash away all the dirt and debris that you see, making sure to get up underneath the siding as well. After that, take the pressure washer and move it to your fence.

Pressure washers are incredibly helpful at removing years off both the siding and fencing around your home.

Be sure to also take the pressure washer to your driveway, removing as much dirt from the surface as possible. You can also, if you have the time, apply the pressure washer to your front porch and back deck.

With all these different areas cleaned and looking brand-new, renting a power washer is a no-brainer for those looking to improve the exterior of their home.

2. Hire Professional Window Washers

Do your home a favor and stop with the DIY window washing chores. Most people half-butt it as is; they merely spraying glass cleaner on the window, and scrub over it with a hand rag, which is hardly effective at all.

Instead, you can have those windows looking better than when you moved in by hiring a professional window washing service.

Rather than spending up to 3 hours cleaning the windows yourself, hire someone that will take less time and render better results. The pros will use better cleaning solutions for a longer, sleeker shine. After they’re done, all your windows will look spotless.

Be sure to read these advantages of hiring professional window washers versus doing it yourself.

3. Clean the Gutters

Have you noticed water pouring out of the sides of your gutters when it rains? Do your gutters look as if they’re being pulled down by a tremendous amount of weight? Is there mold or puddles starting to form around the foundation of your home?

Believe it or not, these are all signs that your gutters are filled with debris and might need to be replaced.

However, before you go jumping to conclusions, take the time to climb up to your roof and clean out the gutters. Be sure to bring a trash bag up with you so that you can safely dispose of the debris and ensure it won’t get trapped in the gutter again.

If you’re unsure of whether your gutters are covered with junk, just consider the number of trees you have in your yard. If it’s more than one, you probably need to clean out your gutters. It never hurts to check!

4. Clean Patio Furniture

All this pressure washing and window cleaning is good stuff, but if you don’t spend time cleaning your patio furniture, it can ruin all your cleaning efforts.

Be sure to pay extra special attention to the patio furniture by hosing them down from time to time. If they have outdoor cushions then be sure to scrub them down with a sponge dipped in dish soap and water, then spray them down with a hose as well.

Wipe down the surface and legs of any tables that you have outside and cater to other outdoor items such as your grill, basketball hoop, plant hangers, etc.

Anything that can be washed, should be washed. When in doubt, be sure to look up how to properly clean a particular item you keep outside your home.

5. Keep Your Landscape Crisp and Trimmed

When’s the last time you went through your yard and trimmed off the dead or faded parts of your flowers, bushes, and trees? Doing so can put your home’s landscape in prime condition well into the spring, summer, and fall seasons.

Of course, nothing makes a landscape look cleaner than a fresh mow of the grass, but be sure to use a weed trimmer to keep that landscape crisp!

While you’re out mowing, try to keep a definitive line between your grass and garden beds. As storms pass, the rain and wind will try to mesh your mulch into the grass, don’t let them!

Well-defined lines and green grass is what separates the good yards from the great yards. Be sure yours falls into the latter category by staying on top of landscaping responsibilities!

Use These Exterior House Cleaning Tips to Your Advantage

Now that you’ve seen several tips on exterior house cleaning, be sure to take them to heart.

Remember that while the tasks might seem tedious, the reward is a home that looks as young as when it was first built.

Be sure to browse our website for more articles on home maintenance, as well as several other amazing topics.

Filed Under: Tips

8 Important Steps to Take After a House Flood to Avoid Mold Remediation

July 6, 2020

Globally, floods do over $40 million in damages every year. While you won’t have to shell out as much money for flooding on your property, it can certainly add up.

The key to keeping your costs to a minimum is taking immediate and effective action.

Don’t know where to start? Here are eight steps you need to take after a house flood so you can avoid needing costly mold remediation.

1. Turn off the Power

No matter how big the flood was, you should always turn off the power. As you may already know, water is a conductor of electricity and could do immense harm to you and your property if you let the two mix.

Don’t just head straight for the fuse box though. Make sure you put on some rubber boots and gloves first. Then, you can grab a flashlight and go turn off the electricity.

In addition to the mains, you should also turn off all fuse connections individually. This might take more work, but it’ll decrease safety hazards.

2. Turn off the Water

Even if the flooding wasn’t due to a burst pipe or anything like that, you should turn off the water as well. That way, if anything does happen to your pipes, they won’t do additional water damage to your home.

After you’ve turned off the power, go around your house, making sure to shut off all water sources. That way, you can have peace of mind knowing you’re doing everything you can to prevent water damage from becoming worse.

3. Take Pictures of Everything

Before you get to work on cleaning everything up, take a quick moment to take pictures of everything. It may even help to take some videos. Either can be easily done with most modern smartphones.

All these pictures will help immensely when you’re making your insurance claim. They’re fantastic proof of the damage and will aid in getting you the maximum coverage possible.

4. Give Your Insurance Company a Call

On that note, you need to inform your insurance company that there’s been flooding in your home. It may be a good idea to have this information in a handy place so you’re not scrambling for it while in the midst of an emergency.

You’ll need to speak with your insurance agent to figure out if you can proceed with immediate repairs. They’ll assess the situation over the phone and either give you a thumbs up or down.

If you’re given the go-ahead, then make sure you properly document everything that’s going on, including all communications and repairs as you go along.

5. Perform Water Removal

When your insurance agent says it’s ok to do so, you’ll need to do immediate water removal, especially for water in the basement. The easiest way to do this is to rent a sump pump and a wet vac.

While you’re getting all the water out of your property, make sure to leave your windows and doors wide open so you can get some fresh air in. This can help the water evaporate and make conditions less favorable for mold to grow.

You’ll also want to put dehumidifiers all around your home so you get further water removal.

6. Sort Through Your Belongings

Once you’ve removed all the water you can from your property, it’s time to sort through your belongings. You’ll have to make some calls on whether or not it’s worth it to salvage things or if they’re even salvageable.

For example, you may have a box full of random magazines from the 2000s. This is probably not worth saving.

On the other hand, if you have a box full of vintage books, then that’ll probably be worth the money and effort to restore.

Take this time to sort things into different piles and then throw away things that aren’t worth saving or are so damaged, you can’t do anything with them.

7. Clean and Sanitize Everything

With the pile of things you’ve saved, you’ll need to clean, sanitize, and dry them. For example, with books, you’ll want to wipe down the jackets and covers, then spread the pages out as much as possible so they can dry.

With furniture and other bigger items, you might have to call in professionals who have the training and equipment to really clean and sanitize these things.

In addition, make a solution that’s 10% bleach and wipe down all the surfaces you can. This will help prevent any mold spores from exploding in growth.

If the flooding’s really bad and it’s reached your refrigerator, you’ll want to throw away anything that’s been touched by the floodwater. You’ll also want to boil water before use for a while after the flood.

8. Start on Repairs If Possible

Last, but not least, you should start on repairs if your insurance agency told you it was ok to do so. For instance, you may have broken windows, so you need to board them up to prevent more water from getting in.

It’s a good idea to call in professionals as they’ll be able to get the job done quickly and effectively.

Act Quickly to Avoid Needing Mold Remediation

If you’ve had a house flood, then it’s crucial that you act quickly and put our tips to use. The longer your home and belongings have soaked in the dirty flood water, the higher the chance of things getting ruined.

Of course, in the worst-case scenario, things may be beyond salvaging. In that case, you may need to seek out a mold remediation expert to sort out your property.

Again, the key is quick action. So once you’ve been through a flood, don’t delay in taking the right steps to preserve both your home and your treasured items.

If this article on what to do after a house flood was useful to you, then make sure you read our other blog posts too!

Filed Under: Tips

Horse Heaven: 5 Tips for Creating Great Horse Stable Designs

July 6, 2020

There are over 2 million people in America that own horses. If you are one of the people that own horses, you might be trying to figure out how to design a space that you love.

There are a lot of horse stable designs that are pretty simple to do, but they will still make the stable better for your horse. Continue reading this article for the best designs for horse stables.

1. Designing Stable Basics

You do want your horses to be outside as much as possible, but there are times when they need to come inside. Understanding basic stable design and how to put your stable together so that the horses are happy is a must.

You can find some basic design inspiration from other stables you’re familiar with, but then it starts to come down to personal preferences and what you believe is best for your horses.

2. Windows and Lighting

Windows are a good way to help horses get plenty of natural light when they are inside. Besides beautiful, natural light that provides many health benefits, it will also help with ventilation.

Make sure you choose windows that are safe for stables. Some of the most popular designs use window grills and yokes, hinged windows, and shutters paired with window yokes.

3. Choosing the Flooring

Horses aren’t designed to spend a lot of their time inside. Horses were made for the outdoors, but sometimes, it is just necessary for them to be inside.

Making sure you pick flooring options that are going to be kind to their legs and hooves is key. Try to find flooring that is easy to clean and maintain, but is also comfortable when your horse will be standing on it for long periods of time.

If you really want to provide maximum comfort, you should consider looking into horse stall mats. They are easy to use and clean, and your horses will thank you.

4. Stall Doors and Size

Of course, you want your stable to look great, but beyond the look of your stable, you also need to make sure that you keep safety and function in mind.

If you can afford sliding doors, these are the safest for your horses and people in the stable. Swinging doors may fling out and hit a person or horse and cause trouble in the stable.

Make sure you buy doors that are solid and will stand up to a horse in case they decide they aren’t happy about being inside.

5. Run In Shelters

Another good thing to add to your stable is run-in shelters. A storm can come up at any time and you want the horses to have somewhere safe to go.

The Best Horse Stable Designs

Now you know more about creating horse stable designs. You can look at your current set up and see what the best options are for you and your needs.

Do you want to learn more about design and other interesting topics? Keep reading our blog for the information you need to succeed.

Filed Under: Tips

How to Remove Dog Hair From Your Home: The Complete Guide

July 6, 2020

Huge Pile of Fur Brushed off Black Labrador

Life will always be better with a dog by your side.

These cute and lovable rogues aren’t called man’s best friend for no reason. They’re loyal friends, cuddly companions, and heart-warming additions to any family.

It’s hardly surprising that more than 63 million households around the country own one.

However, for all the joy dogs bring to life, they cause a fair amount of trouble too. These cheeky chappies tread mud along freshly cleaned floors, raid pantries when nobody’s looking, and delight in shaking water around.

Worst of all, though, you have to remove dog hair from every single surface in the house! They seem to molt fur like trees shed leaves in the fall. It gets everywhere, all the time.

Want some top tips to clean up those dog hairs with greater ease? Let us help. Keep reading for a complete guide on how to remove dog hair from carpet, clothes, and surfaces.

Brush Your Pet Pooch

Prevention is always better than cure, right?

That’s definitely the case when it comes to cleaning up dog hairs. Taking steps to stop your dog(s) shedding so much hair will make your life ten times easier. Less fur will fall out, which means there’s less to remove thereafter.

Sound good? Well, get yourself a high-quality doggy brush. It’s time to get grooming.

Brushing your dog’s coat on a regular basis will do two things. Firstly, it’ll make their coat look beautiful and shiny! Secondly, you’ll brush away fur that would otherwise fall out in your house!

This is most helpful in the warm summer months when molting increases to a whole new level. Be sure to take your dog outside for a brush at every opportunity. They’ll love the attention; you’ll love the lack of hairs in your house!

Break out the Vacuum Cleaner

The vacuum cleaner is your best friend in any pet hair removal process.

A good quality one should make light work of getting up the dog fur. However, the real key to success is staying on top of things. Delay the vacuuming too long and the hair will accumulate to a point that’ll make it more difficult to clear up.

You’ll have to do multiple runs and go over and over your floors (especially if they’re carpeted) to rid them of the dog fur. Prevent that eventuality by vacuuming high and low on a regular basis.

Oh, and you could use a humidifier too! Aside from their other benefits, some quirk of their functioning stops pet hair from clinging too closely to surfaces. The vacuuming becomes easier as a result.

Put Baking Soda Down

Want more of these tips for cleaning your carpets?

Well, here’s another: sprinkle them with baking soda before you start hoovering!

This incredible culinary ingredient can make a significant difference. A light pre-vacuum sprinkling should loosen up any hairs from the carpet, helping your vacuum cleaner pick up any hair with less trouble.

Don’t worry if you don’t have any baking soda to hand. Spraying your carpets with a well-diluted solution of fabric softener and water should do the same job.

Sponge/Mop Your Carpets

Yes, you read that correctly!

We know, wet mops and sponges are usually reserved for cleaning tiles, laminates, hardwoods, and so on. However, you’d be surprised how effective they can be at clearing up dog hairs from carpets too.

Having finished with the vacuum cleaner, try running a clean and damp mop/sponge over your low-pile carpet. Any hairs that were left behind will get stuck to it.

The same goes for your curtains, sofas, or anything else in the house that’s upholstered. The damp sponge, cloth, or mop should handle any animal hair removal from your upholstery.

Buy a Lint Roller

Lint rollers are a classic hair-removing tool.

An adhesive material is attached to a barrel that has a spindle running through its center. Holding a handle, you roll the sticky barrel along any hair-covered surfaces (including clothing), picking up any hairs as you go. Make sure you keep a steady supply of them to hand to facilitate your dog hair removal efforts.

Be wary though. The trick to success is finding a high-quality lint roller that actually works. All too many prove ineffective, leading to hours of fruitless rolling and substandard results.

Consider using other tools and techniques to remove the majority of dog hair first. Then, if there are any remaining, a lint roller should provide the finishing touch.

Use a Rubber Glove Instead

Don’t worry if you’re lacking a lint roller. We’ve got another pet-hair removal hack that could prove just as effective:

Try wearing rubber gloves instead.

That’s right, the rubber gloves you use to wash the dishes can be a useful tool to clear away unwanted dog hair. Pop them on, get them wet, and then rub your hands over any hair-covered surface. The hairs should come away with it.

Lacking lint rollers and rubber gloves?

Well, how about balloons? If you’ve got any balloons in the house, then they too can be used for this purpose. Give it a go by inflating one and rubbing it over the affected surfaces.

The static electricity that gets created should attract any hair onto the balloon. Then, when you’re done, simply burst it and chuck it in the trash.

Time to Remove Dog Hair From Your Home

There’s no denying how much joy dogs deliver to life. They lift your spirits, warm your heart, and provide a loyal companion at all times.

However, as the tens of millions of dog owners in America know all too well, these mucky pups can be a nightmare to clean up after- especially when they’re molting all over your floors.

Do you know the struggle? We hope the tips in this post have provided all the information required to remove dog hair from your home with newfound ease.

Would you like to read more articles like this one? Search ‘pets’ on the website now!

Filed Under: Tips

How Much Does a Termite Inspection Cost on Average?

June 24, 2020

How much does a termite inspection cost?

It’s not as expensive as you might think. We’ve put together this guide to show you how much you should expect to spend during a termite inspection so you can set enough money aside.

Keep reading to learn more!

Breaking Down the Cost of a Termite Inspection

It’s difficult to put an exact price tag on the price of a termite inspection. The cost can vary depending on a number of factors.

However, on average, you’ll end up paying between $75 and $150 for this type of inspection. When you talk to a pest control company about the estimate, though, don’t be surprised to hear the number go up or down on either end.

The bigger your home, the longer the inspection will take. This means the price will get higher as well.

The Company You Hire

Every company chargers a slightly different amount for their inspection services. Because of this, it’s a good idea to spend some time shopping around before you hire anyone.

But this doesn’t mean you should choose the cheapest option!

Remember, you get what you pay for. Instead of going with the cheapest company you can find, do your research. Read their reviews so you can find the best services and the most affordable price.

What Happens During a Termite Inspection?

There are several different types of termite inspections. For example, you can hire a pest control company to inspect your home, a home inspector can look for signs of termites before you buy or sell a home, or you can get handover inspections.

No matter what type of inspection you get, though, they’ll all be about the same.

The inspector will go through your home and look for any signs of termites. This means they’ll have to climb into your attic, go down into the basement, get into your crawlspace, and check other “at-risk” areas.

They’ll also spend some time outside your home, too. Even if your home isn’t infested yet, they can find any termites that are in the ground outside or already eating away at your deck or the outside of your home.

If They Find Termites…

If the inspector finds any termites, they’ll let you know the extend of the problem. After this, they’ll also be able to walk you through the different extermination methods and which option will fit your needs the best.

If They Don’t…

If they don’t find anything, that’s great!

You should never few this as a waste of money. Think of it as prevention instead. Ignoring termites if you think you have an infestation will only cause the problem to get worse, meaning you’ll have to spend more money to fix it later.

You should always get an inspection to rule out any trouble.

How Much Does a Termite Inspection Cost?

So how much does a termite inspection cost?

While the exact price depends on the specifics of the job, a termite inspection isn’t expensive. It’s well worth the money because it will help you get rid of any termites in your home, which will help you save money in the long run.

Want to learn some other helpful homeowner tips?

We’ve got you covered! Make sure you take a look at the rest of our blogs today!

Filed Under: Tips

Replacing a Roof: Should I Be Home During Roof Replacement?

June 22, 2020

Replacing a roof is a task most homeowners face at some point. Roofing can outlive its useful life or get damaged by stormy weather. Sometimes, homeowners replace the roof so it better matches a new paint job.

When the time comes for the actual work, you might ask: “Should I be home during roof replacement?” It’s an important question since the answer can mean a serious disruption in your life.

Keep reading and we’ll cover whether you should be home and other tips for roof replacement survival.

At Home During a Roof Replacement?

The question about being at home during the roof replacement doesn’t offer a clear answer.

Can you remain in your home during the work? Yes, in most cases, you can remain in the home if you follow some basic safety precautions.

Should you remain in the home? That depends a lot on your lifestyle and distraction tolerance. We’ll cover the pros and cons in the next sections.

Staying At Home Benefits

House roof replacement is one of the most expensive home repairs you can make. For an average-sized home, the cost can run over $10,000.

If you do remain at home during the work, the major benefit is that you avoid additional expenses like hotel bills and restaurant trips.

Remaining in the home also makes you readily available if the roofers need to consult you. For example, say they find damage in an unexpected area. The roofer will need your permission and probably a price adjustment to fix the problem or get someone else to fix it.

Staying at Home Pitfalls

The roofers must minimally tear off the old shingles and remove nails. In some cases, they must also tear off and replace the vapor barrier and plywood.

That work makes a lot of noise, which can prove very distracting if you work at home. All of the noise and disruption can also leave pets out of sorts.

In general, you’ll need to keep your kids inside to avoid falling debris and loose nails on the ground. You must find parking away from your home for similar reasons.

While most roofing jobs wrap up in a few days, bad weather can extend the process a lot. While you get a break from noise and work, you must also brace yourself for it to continue when the weather clears.

Parting Thoughts on Should I Be Home During Roof Replacement

The question of should I be home during roof replacement lacks an obvious yes or no answer.

For homeowners with kids and pets, staying home may prove problematic. You must keep your kids inside and away from the falling debris. The incessant noise and disruption will leave your pets disturbed.

If you don’t distract easily and don’t savor the idea of living in a hotel for a few days, then staying home may make sense. You may still find it’s best for kids and pets to stay elsewhere while the roofers do the work.

Want more home repair or home design tips? Check out our home and decor sections on this site.

Filed Under: Uncategorized

7 Spectacular Roof Design Ideas

June 19, 2020

If you’re a homeowner, you could increase your home resale value by around $12,000, just by installing a new roof.

You can capitalize on the roof design to enhance curb appeal and be the envy of all your neighbors. However, to do that, you first need a stunning roof design that you can work with.

Roof design has changed over the years to involve even more complex and sophisticated designs. Not to say that all modern roof designs have complex geometry and architecture. Many contemporary roof design ideas are in line with the minimalist taste.

In this post, we’ll be highlighting some incredible roof designs that you could consider for your home.

1. Gable Roofs

Gable roofs are as traditional as they come, and are pretty popular across the country. Gable roofs are also known as pitched or peaked roofs.

You can quickly tell gable roofs from their characteristic triangular shape. In fact, the term gable alludes to the triangular shape formed when the two roof panels meet at the top.

Gable roofs are relatively easy to construct, and contractors have a breeze installing them. Apart from their ease of installation, gable roofs also shed water and snow easily because they don’t have hips or interruption on their slopes. You also get more space and enough ventilation for your attic or vaulted ceiling.

The downside with gable roofs is that the roofs don’t do very well in areas with strong winds. If the roofing contractor doesn’t construct it with enough supports, then the roof can easily collapse.

2. Flat Roof

As you can tell from the name, flat roofs are roofs that are flat. However, even the name can be misleading because flat roofs aren’t entirely flat. These roofs have a slight pitch to allow water to run off and drain away.

Flat roofs are among the more contemporary roof designs that have become popular with most American homes.  They are also the go-to roofing choice for many industries, especially for warehouses.

A flat roof can act as an extra outdoor space where you can have a patio, roof garden, or maybe even swing your golf club a bit for practice.  You can even place your outdoor AC units on the roof and leave the backyard to the flowers and garden plants.

The flat roof design is also ideal for solar panel placement because the solar panels directly face the sun. The only downside with flat roofs is that they don’t do well in areas with heavy rain. Because the roof has a very low pitch, water doesn’t drain away as effectively, and it could pool on the roof surface and even lead to leaking.

3. Skillion Roof

You can use the name skillion roof interchangeably with a shed roof. In some areas, skillion roofs are also known as lean-to roofs. Skillion roofs have a very peculiar design, with only one single sloping panel, hence the name lean-to roof. You can think of a skillion roof as half a gable roof or a flat roof with a higher pitch.

These types of roofs are mainly used for porches and sheds. However, modern designs involve using skillion roofs for the entire house and not just for porches and home additions.

Because of their simple design, installing skillion roofs is simple and requires fewer materials than other roofing types. Rain and snow easily run off skillion roofs because of the high pitch; hence it’s an excellent roof for areas with heavy rain and snow.

With skillion roofs, however, you have to be really careful about the pitch. An overly high pitch can make your ceilings too low. Skillion roofs also don’t fare well in very windy areas.

4. Mansard Roof

The mansard roof is also known as the French roof.  Unlike gable roofs, mansard roofs have four pitched sides. However, these four sides don’t meet at a single point on top. Instead, there’s an almost flat rectangular surface at the top where all pitched sides meet.

Mansard roofs are stunning to look at, and they also provide a little extra space for the attic. The downside with mansard roofs is that they are costlier than many other roof types. However, despite the high costs of installations, mansard roofs significantly increase your home’s value.

5. Hip Roof

Just like a mansard roof, a hip roof slopes on all four sides, but with hip roofs, all four sides come together to form a ridge on top.  Since the roof slopes on all sides, water and snow run off the sides easily.

They are also more stable than gable roofs in very windy areas. The downside to hip roofs is their cost. They are more expensive to construct than gable roofs and also require more materials. You also need to find a competent roofing contractor like Bartlett Roofing because it’s not so easy to install, and anything wrong can be disastrous.

6. Saltbox Roof

The name slat box comes from the roof’s resemblance of old salt boxes with a similar design. These rooms are asymmetric, with one side protruding farther down than the other.

The longer side disperses water to the ground quite easily, and the shorter side doesn’t accumulate much water or snow. It’s also cheaper to install and has a unique look that chic homeowners fall in love with.

The downside to saltbox roofs is that the side of the house where the longer part is will have a slanted ceiling. This makes the roof very impractical for smaller houses.

7. Butterfly Roof

The butterfly roof gets its style from the “M” shape the roof forms that make it look like a butterfly ready to take off. This shape means that the roof slopes and meets in the middle. The point where the roof meets also slopes to allow for better drainage.

Butterfly roofs can withstand heavy, snow, wind, and rain and also look stunning. These roofs are, however, on the costlier side of things.

Find Roof Design Ideas Best-Suited to You

Clearly, there are plenty of roof design ideas, and all you have to do is find one that fits your taste. However, aesthetics aside, don’t forget that roofs also serve a functional purpose. You don’t want a roof that can’t withstand the weather conditions of your areas.

Lastly, remember to get a roofing contractor that can handle the job properly. Your roof is going to be only as good as the contractor you settle for.

For more informative articles, do have a look at the other posts on the site.

Filed Under: Uncategorized

Cool Outdoor Lights That Will Light up Your House and Your Life

June 19, 2020

If you’re looking for a great way to spice up your home, consider outdoor lighting. Outdoor lighting is sometimes overlooked, but it can make a huge difference in making you and your family feel safe.

Not to mention, cool outdoor lights make your home more attractive without spending absurd amounts of money.

Since there are lots of options for outdoor lighting, it can be challenging to sift through them all.

Luckily, we’ve compiled all the best outdoor lighting options sure to make your house pop!

Decorative Lighting

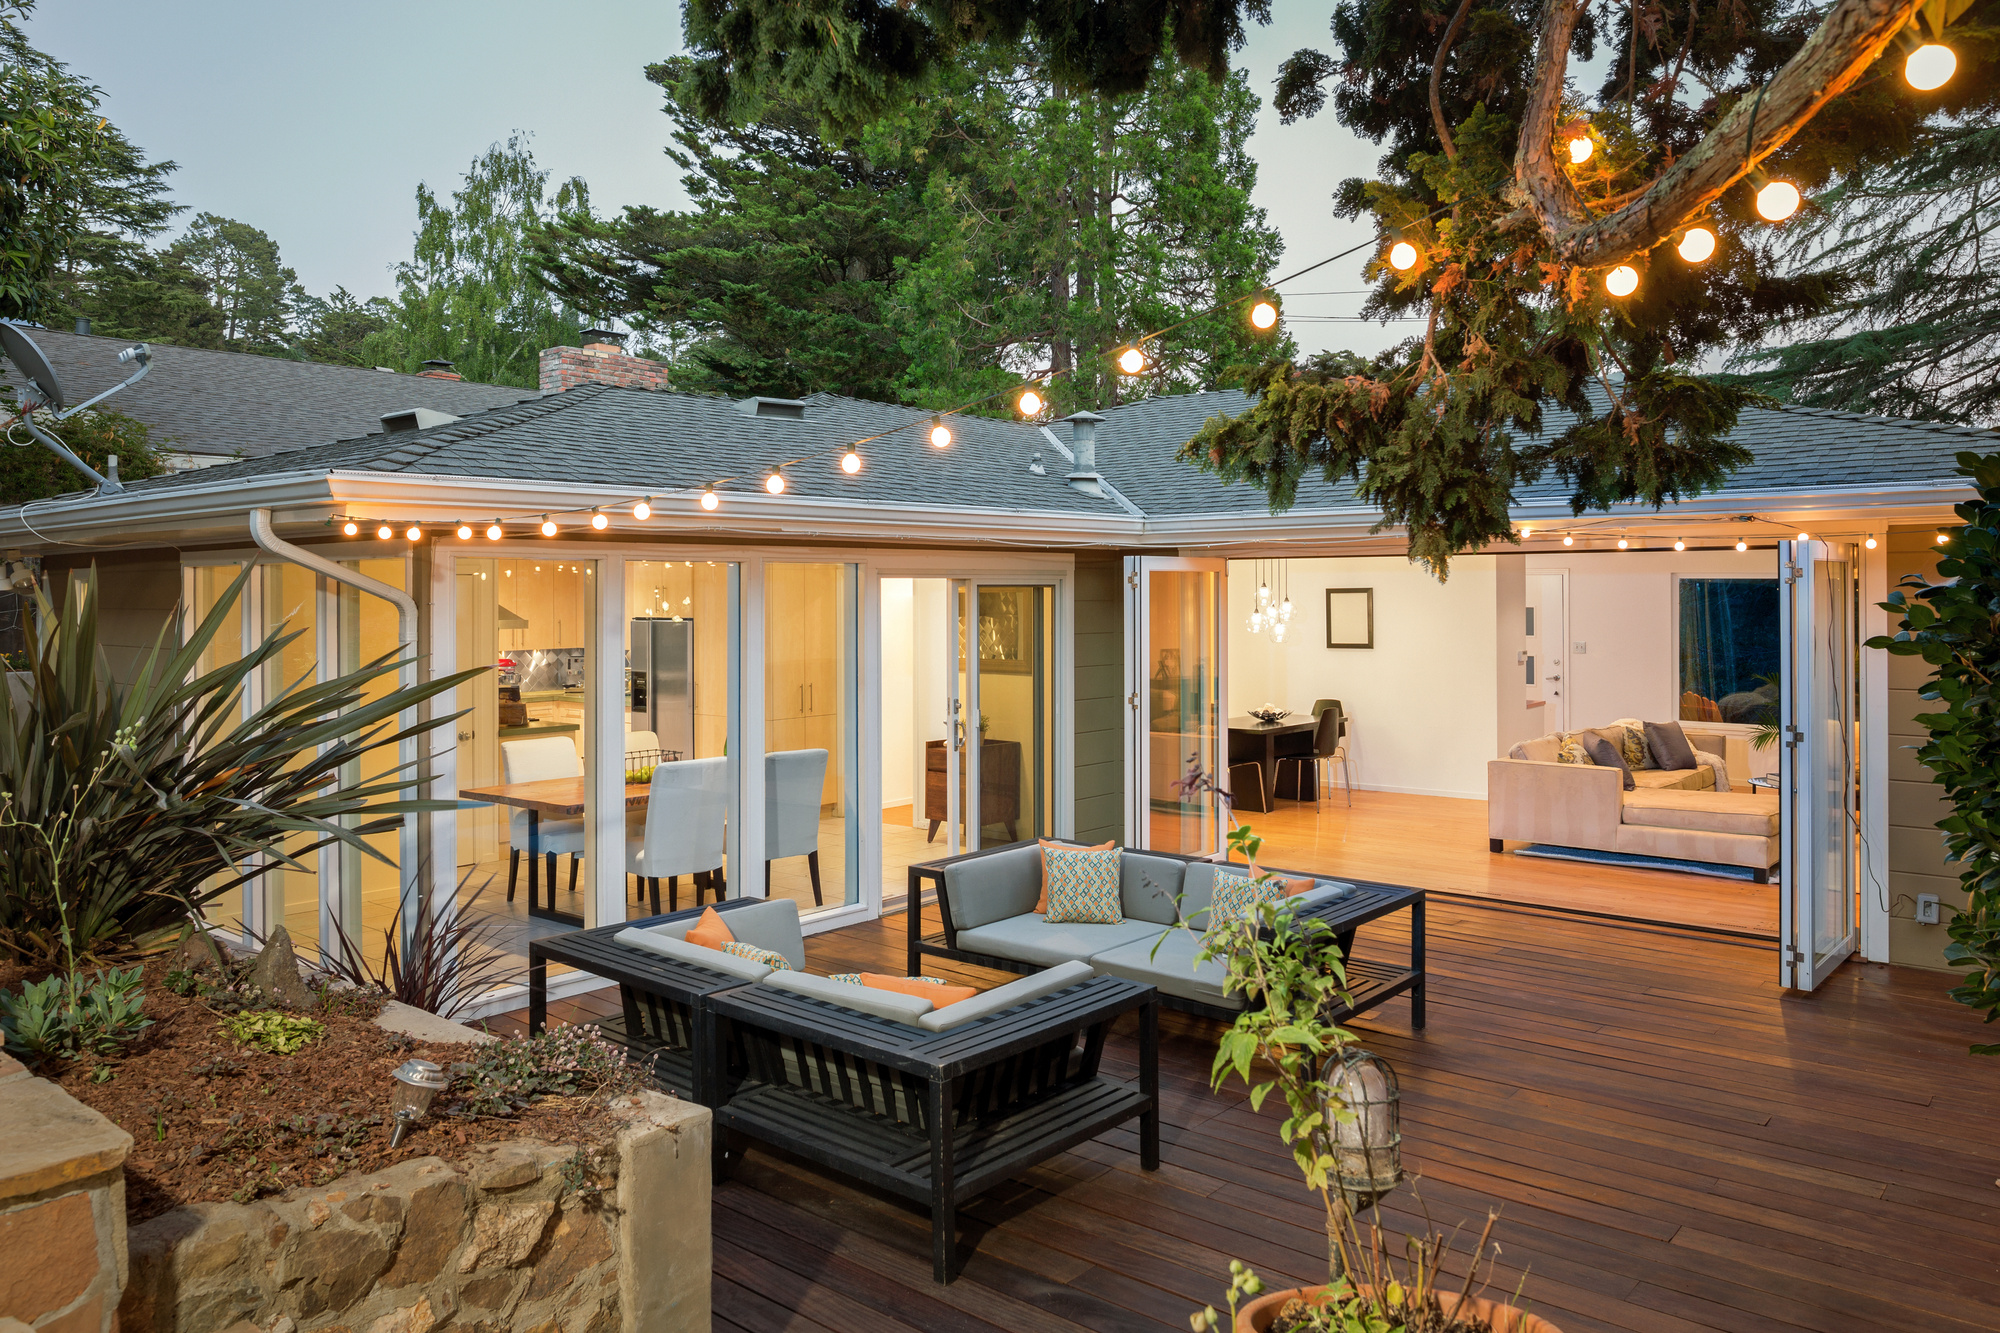
If you’re looking to improve the aesthetic of your home, consider string lights, rope lights, outdoor bar lights, or even post lighting around the backyard or patio. Lantern lights can be a charming option around a pool or bonfire area as well.

Changing the colors of the lighting can also add a unique and fun look to your home.

Plus, if you’re someone who hosts parties and get-togethers, decorative exterior lighting can improve the ambiance and make your home more welcoming.

Flood Lighting

If you’re more worried about security than improving the aesthetic of your home, consider putting up floodlights. Floodlights are used to light up stairways, garages, and areas of your property.

Installing exterior home lighting is a useful tactic in warding off potential intruders. You can purchase floodlights with a motion sensor to save energy and ensure it’s used when necessary.

The sensitivity of floodlight sensors can also be adjusted to match your needs.

A good tip is to position floodlights at least nine feet above the ground to maximize the illuminated space.

Landscape Lighting

Landscape lighting is considered one of the best options for outdoor light fixtures because it can heighten security while also providing a beautiful aesthetic.

Landscape lighting includes Ballard lights and pathway lights that come in different shapes and sizes to match your home. Wall lights and outdoor ceiling lights are other options that are used to illuminate doorways or highlight attractive aspects of homes.

If you have a garden, you can also use well lights to draw attention to your plants, flowers, or shrubs.

Check out these other outdoor lighting options if you’re looking for even more variety.

Lighting for Safety

If you want to improve the security of your home and increase your safety, you can use dusk to dawn lights. These lights will automatically turn on after dusk and will turn off at sunset.

You can also try less harsh options, like dark skylights. Though they must be fully shielded, they reduce unnatural blue light.

Each of these options can provide increased security and safety. If you are coming home late at night, these lights can illuminate the walkway and prevent tripping and falling.

Now You Have Some Options for Cool Outdoor Lights

Whether you are concerned about safety or you want to make your house look more attractive, outdoor lighting can help improve your home.

No matter what your home looks like, you can find cool outdoor lights that complement its appearance.

Why wait any longer? Get started on those lights! And if you loved this article, don’t forget to check out some of the other awesome content on our site.

Filed Under: Uncategorized

Patio Inspiration: 5 Awesome Ideas and Trends for Your Patio in 2020

June 18, 2020

You’ve got a patio attached to your house. It’s alright, but not exactly something to write home about. Simply put, you want this to change.

That’s why you’ve arrived at this article. You’re looking for a bit of patio inspiration. Fortunately, we can provide it to you.

Without further ado, here are 5 awesome ideas and trends for your patio in 2020.

1. Add Cushioned Furniture

When you think of patio furniture, you likely think of metal chairs. While metal chairs are certainly prominent on patios, they’re far from the only types of patio furniture available. These days, one of the most popular patio furniture options is cushioned furniture.

Cushioned chairs; cushioned couches, cushioned footrests. It’s all available and it could do a lot to improve the look and functionality of your patio. Learn more about buying outdoor furniture now!

2. Install Decorative Lighting

Is your patio lacking light? Is its only source of light a bright floodlight that practically blinds you every time it turns on? If so, you need to think about implementing some decorative lighting.

Christmas lights, recessed lights, path lights, and other types of lighting could be exceedingly beneficial in upping the performance and aesthetic of your patio. You don’t need to drop hundreds of dollars. You can buy sufficient lighting for 20 to 30 bucks.

3. Implement a Fire Pit

As time passes, more and more homeowners are gracing their patios with fire pits. These fire pits serve two purposes: 1. They provide their respective patios with an enhanced aesthetic, and 2. They allow for warm gatherings on cool nights.

There are a few options available to you. One option is to hire a contractor and have a fire pit built into your patio. The other option is to buy an independent fire pit and simply place it on top of your patio.

4. Set Up an Outdoor Kitchen

Like to barbecue? If so, you might consider adorning your patio with an outdoor kitchen. By adding a grill, a refrigerator, countertops, and cabinetry, you can greatly enhance the culinary capabilities of your outdoor area.

Kitchens such as these bring a whole new level of prestige to a patio. They serve as both functional entities and aesthetic statements.

5. Place Succulents

In and of themselves, patios are fairly cold and unforgiving places. After all, hardened cement isn’t exactly the most inviting material. For this reason, you need to provide it with some atmosphere.

One of the trendiest ways of doing this is to place succulents around the patio. Succulents provide a laid-back and whimsical feel, softening the hard edges common of patio areas. Available for about $5 each, they’re affordable and effective.

Take This Patio Inspiration and Run With It

With any hope, you now have some patio inspiration on your side. Now all you have to do is run with it. Doing so is sure to yield a beautiful and interesting patio area, one that’s perfect for parties and get-togethers.

Looking for similar info? Our website is the place to be. Check out our other articles now!

Filed Under: Tips

How to Design the Perfect Fitted Wardrobe

June 18, 2020

You’re making the right decision if you get a fitted wardrobe. It might be expensive, but it will last long. You can also design it in any way you want. If you have a limited budget, it’s not a problem. You can think of a design that will be suitable for whatever amount you can afford to spend. If you begin to plan your fitted wardrobe like the ones at www.myfittedbedroom.com, these steps will help you.

Determine your needs

Start by looking at what you want in a closet. Some people prefer to have more drawers, while others want more rods to hang their clothes. Others also want to have a jewellery box where they can keep all the accessories. Look at your closet and see what’s inside. It’s easier for you to envision how you want your closet to look, depending on your clothing and accessories.

Look at other options

If you don’t know where to start, you can look at other examples. Check out websites where there are samples of fitted wardrobes. Some of them might look good for your bedroom, while others might be too much. Save the images that you think would be perfect for your house. Use them as a reference when you begin to design your closet.

Think of a theme for your bedroom

Since you’re going to spend money to build a customised wardrobe, you should also think about the perfect theme for your bedroom. It’s time to overhaul the design of the bedroom and make it more appealing. If you decided to choose a classical theme, your closet design should be suitable. It means that you have to choose neutral colours and simple aesthetics.

Choose quality materials 

Never sacrifice the quality of materials used in creating the closet. You’re going to use it for a long time, so you need the best materials. Otherwise, there will be frequent repair issues. You will feel frustrated when you already spent a lot of money to build the closet, and you have to spend more for repairs.

Seek advice from the builders

If you still don’t know the design, you can ask the builders. You will get help from an expert in designing a fitted wardrobe. Although the advice helps you in deciding, you will still make the final choice. You can tweak the original design given to you based on your preference.

When you choose the right partner for creating a customised closet, you can expect quality results. You will feel fine spending a lot of money because you know that you can use the furniture for a long time.

Go through the plan again before asking the builders to start the job. A built-in closet will stay in your bedroom forever. You can’t make changes since the furniture is attached to the wall. You can also request a payment plan if you think you can’t afford the overall cost. Don’t settle for anything less if you think you can’t afford the design you want for a closet. Suspend your plans for now and revisit the idea when you have enough budget.

Filed Under: Tips

  • « Go to Previous Page
  • Page 1
  • Interim pages omitted …
  • Page 29
  • Page 30
  • Page 31
  • Page 32
  • Page 33
  • Interim pages omitted …
  • Page 48
  • Go to Next Page »

Primary Sidebar

About

Hi and welcome! I’m Lenny, and this blog space is my Internet home. I write, I cook, and I design. I love to take pictures of all things food and home décor.

Recent Posts

  • 3 Signs Assisted Living Is Right For Your Older Parent
  • E-commerce Store Budget: 3 Tips for Beginners
  • 3 Tips For Setting Boundaries With Your Adult Children
  • 4 Biggest Mistakes People Make When Buying Property
  • 3 Tips For Designing A Beautiful Custom Kitchen

Let’s Connect

  • Facebook
  • LinkedIn
  • Twitter

Facebook

Skipping Stones Design

Latest

3 Signs Assisted Living Is Right For Your Older Parent

E-commerce Store Budget: 3 Tips for Beginners

3 Tips For Setting Boundaries With Your Adult Children

Footer

About

Hi and welcome! I’m Lenny, and this blog space is my Internet home. I write, I cook, and I design. I love to take pictures of all things food and home décor.

LatestPost

  • 3 Signs Assisted Living Is Right For Your Older Parent
  • E-commerce Store Budget: 3 Tips for Beginners
  • 3 Tips For Setting Boundaries With Your Adult Children
  • 4 Biggest Mistakes People Make When Buying Property
  • 3 Tips For Designing A Beautiful Custom Kitchen

Let’s Connect

  • Facebook
  • LinkedIn
  • Twitter

Copyright© 2025 · Dear Theme by Shay Bocks